Tuesday, December 20, 2011
Still There
Friday, December 16, 2011
From the Shadow Farm

I can now count myself as the proud owner of an original Dave the Dead sculpture. It's a really nice little piece that I won in a giveaway on his excellent blog. Hmm...I see a pumpkin collection forming in the future...
Thanks, Dave!
Sunday, November 13, 2011
New Blog Picture Thingy
It was time for a change, and I wanted to "own" this blog more, so I decided to make a new picture up at the top there.
For the sake of reminiscing, here's the old one:

I tried to keep the spirit of Don Knotts there without having his actual picture. Hopefully it comes through. I also thought it ought to better reflect what this blog is about these days. The new one will be sort of a work in progress as I figure out exactly what I want it to look like.
Monday, November 7, 2011
Exciting News!
I've just been admitted to the Dick Smith Advanced Professional Make-up Course. Some serious creature and character making to come. Wish me luck!
Monday, October 31, 2011
Zombie Makeup Application

I finally had a chance to apply my "Walking Dead" inspired zombie makeup. Custom foam latex appliance, PAX paint, alcohol-activated makeup, creme makeup, custom out-of-mouth dentures.


Oh No!
My brains are all exposed!


Pumpkin with sculpted brains for the Honors Department at my university. It's dried out a little since I sculpted it on Friday.
In other news, happy Halloween! Good luck to all you haunters tonight. I'll be posting one more time before the day's over, so don't forget to stop by again soon.
Friday, October 28, 2011

Thursday, October 27, 2011
The Death of a Monster Book

Without doubt, the most complicated build on "The Book Eater" was also the one that gets the least screen time. The book is shot, then doused with cleaning solution (a bottle/label I whipped up a half hour before call time on the last day of the shoot, and which was eventually shattered by the actor who had to throw it at the book for one too many takes). It bleeds out its last inky-oozy breath, and our heros are safe.

I fabricated a third book with bullet holes in the cover and pages made of most of a ream of paper hot glued to a cardboard spine.

The ink slime was made of Karo syrup tinted black and pumped through vinyl tubing with a turkey baster (well, three turkey basters-- one for each sliming point). The tubing ran through the book from the spine until about 3/4" from the front pages. As you can sort of see from the first picture, it took three of us to execute the effect, as the pressure of the syrup was nearly too much for the turkey basters.

Here's some test footage. The bottle on top here was to coax the slime into exiting out the front instead of just lifting the pages up.
And this is what it looks like on the inside. Drilling eight inches through a ream of paper isn't exactly the easiest thing in the world, but once I (and all the carpenters working in the scene shop of the theatre department) figured out how to do it (hint: it took 3 different drill bits), it went pretty smoothly.

That's all for "The Book Eater" until the director shows me some finished clips. Thanks for following along.
Thursday, October 20, 2011
Spoiler: The Dog Dies
The monster book in "The Book Eater" eats the dog off camera, so I needed a bloody collar and dog bed. I used Mehron "3D gel" (useful stuff to have around, though only worth buying if it's from the 90% off post-Halloween sale, as it's dead simple to make) on the collar so it would look wet, but be completely solid so as to not get on the floor of the bookstore in which we were shooting.
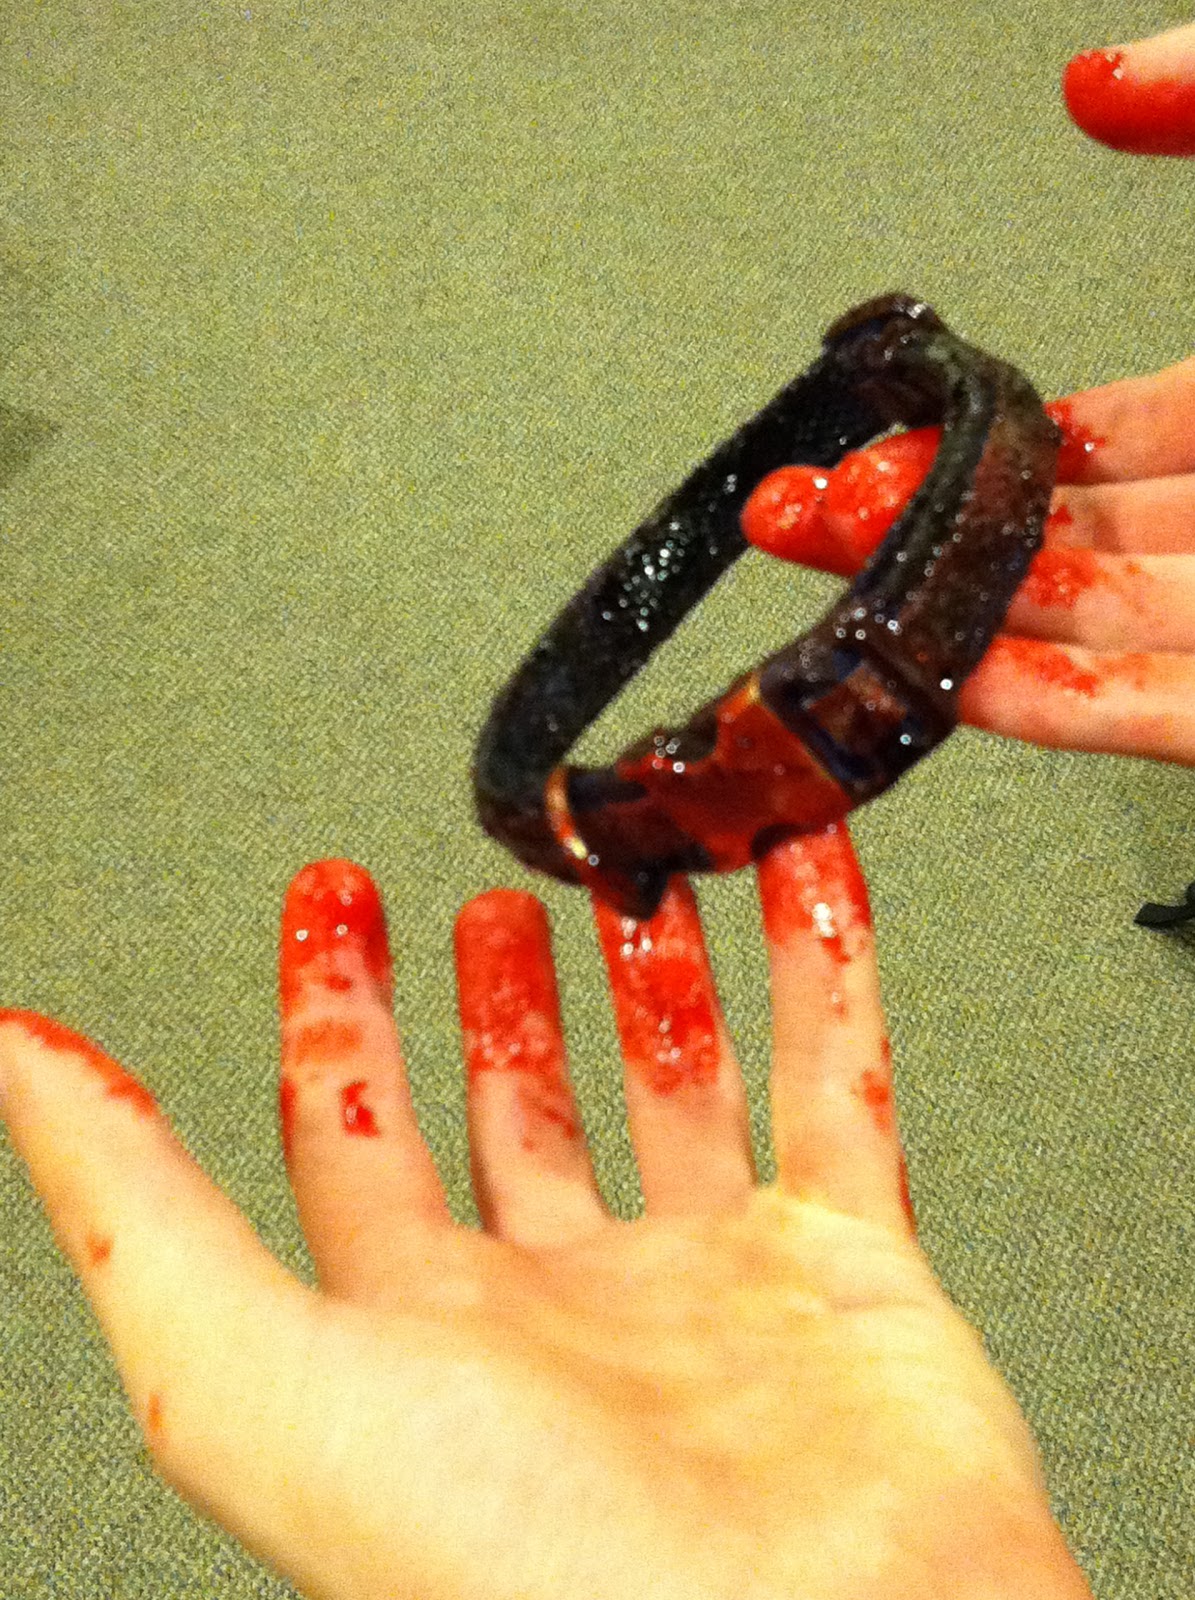
I imagine most people reading this blog know that you can't just splatter fake blood all over and be done with it. The blood has to make sense. So I asked the director how the dog dies.
The dog is sitting on his dog bed, minding his own business, when the monster book comes out of nowhere and wraps its tentacles around him.
He starts clawing at the bed, trying to wriggle free, and he tears up some of the cushion.
The book tentacles constrict the dog like a python and squeeze him so tightly that he POPS like a water balloon!
Whatever's left gets dragged off the bed and swallowed by the book.
Actually, I think the director just said the bed is torn up and bloody after the book's tentacles constrict the dog... I might've embellished a little.
It's all there. See it?

More "Book Eater" to come...
The Book Puppet... with Teeth

Part of the "Book Eater" script called for the Gorgonomicon book to open, "revealing a mouth instead of pages, with rows of teeth, several tentacles, and an esophagus that continues on for miles." It also crawls across the floor of the bookstore using the tentacles that come out of the throat and lunges at the two protagonists.
On a bigger budget, I would have loved to do all of this with puppets and visual trickery, but it was decided that the throat and tentacles would be CGI. So, it was my job to make a puppet book identical to the hero prop that would act out the scenes and provide a canvas of sorts for the digital effects.
The result was controlled by two rods that could tilt the book up and down, turn it, slide it, and open its mouth.


With some advice from Jedi Master Dave Lowe, I used air dry clay over a foam board box and essentially stamped in a closed book pages texture.
The teeth are hot glue castings from a plaster mold, so I only had to actually sculpt about 6 teeth. You can sort of see the channel I cut in the inside cover for the lower teeth to hide in while it's closed. The upper teeth slid behind the lowers.
The torn pages you see here are my last minute addition to help transition from puppet to computer generated throat. Without those, it just looked like the edges of a box all around, and that sort of gives away the illusion.
It's not a perfect prop, but because it's moving around in all its scenes, I think it's actually a fairly convincing effect.

Of course, I couldn't let anyone else operate the puppet on set. :)
More "Book Eater" to come...
Wednesday, October 19, 2011
Sea Monsters Revealed

The first is based on this still from 1955's It Came from Beneath the Sea.

I just turned the Golden Gate Bridge into a column and tossed the Parthenon in the background for...balance...or something.

The image was extended and the wolf replaced with a squid.
More "Book Eater" to come...
Tuesday, October 18, 2011
Ink Slime and a T-shirt
In the script for "The Book Eater," everywhere the monster book goes, it leaves trails of inky slime. We were shooting in real locations, so we couldn't just spill anything that might stain their walls or furniture. I had a few different solutions that I'll share in this post.

This was a rehearsal of a scene exploring the aftermath of the book tearing through a storage room that we see previously stacked floor to ceiling with boxes of books. I was rather pleased with the way it all turned out, though it looked better in the real scene than in my pictures.
The ink on the boxes was clear Elmer's glue tinted black. I laid out a torn up box and dripped ink over the parts I thought the book monster might have been in contact with.
I had my assistant (whom I had the producer upgrade to Art Director because he was so helpful throughout the shoot) grab discarded pages from the university library's printer room to tear up and blot with black paint to simulate monster-ravaged books.
The ink blobs were a bit of trial and error, but I ended up making them out of hot glue painted black with a gloss coat for wetness. Once peeled off of the bathroom counter, they can be positioned and repositioned as needed from set to set.


One of the bookshelves we dressed with the torn paper and ink blobs.
There was one other method of ink slime, which I'll get to in a future post. It's pretty cool.

Last for today is one of the actors in the shirt I made, based on the director's concept. He's supposed to be a fantasy/sci-fi geek kid. Craft paint via custom stencil on a $3 t-shirt. I went with craft paint because it would be a more matte finish than fabric paint...just don't wash it.
More "Book Eater" to come...
Sunday, October 16, 2011
Monster Book

I've spent the last two months or so working as the production designer on a student film called "The Book Eater". Sets, props, costumes, and...yeah, that was about it. I got involved because the director is a friend of mine, and also there's a monster book that terrorizes a bookstore owner (sounds like fun to me!). I'm going to spend the next several posts talking about the different pieces that went into making the film happen.
First, I'm just going to look at the hero prop of the "Gorgonomicon" book. I made three books for various parts of the film, and this is the one that just sits and looks pretty for the actors to interact with.
The construction is based on Dave Lowe's Creepy Old Book Making how-to.
The book is built around an old dictionary the director found.
...It's also built backwards. It was decided that this would add a little extra mystery to the prop.

Foam core, cereal box, duct tape, and hot glue form the structure of the cover.

A few of the camera-ready pages of the hero prop featuring Latin poetry in some font out of Lord of the Rings, and fake woodcuts of rampaging sea creatures. Incidentally, both images are references to existing monsters (if anyone recognizes both, I'll be really surprised and give you a virtual high-five).
More "Book Eater" to come...
Stolloween Pumpkin
It's here! My Stolloween pumpkin arrived in my dorm room on Friday.

This was the random winner from Scott Stoll's second "Build Me a Pumpkin" contest, so it's his three-dimensional interpretation of my design idea (below). It's a big pumpkin (Haunted Mansion iPhone included for size reference) with 5 removable flies and a whole lot of rot.
Although Scott did all the hard work on this, it reminds me how fun collaborations with other haunters are, especially with great artists like Stolloween.

Thanks, Scott! It looks great.
Tuesday, October 4, 2011

Wednesday, August 31, 2011
Monster Makeup Case

Harbor Freight tool case, custom stencil, silver craft paint.
Monday, August 15, 2011
Unexpected Groundbreaker


Sunday, August 14, 2011
Post-Leota Build

For those who missed the live show, we recorded some clips from it which you can view here.
Many thanks to Robert and Stacy of CalHaunts NorCal and Mantooth Manor who helped behind the scenes.
We all enjoyed ourselves, and hopefully everyone else got something out of it.
Thursday, August 11, 2011
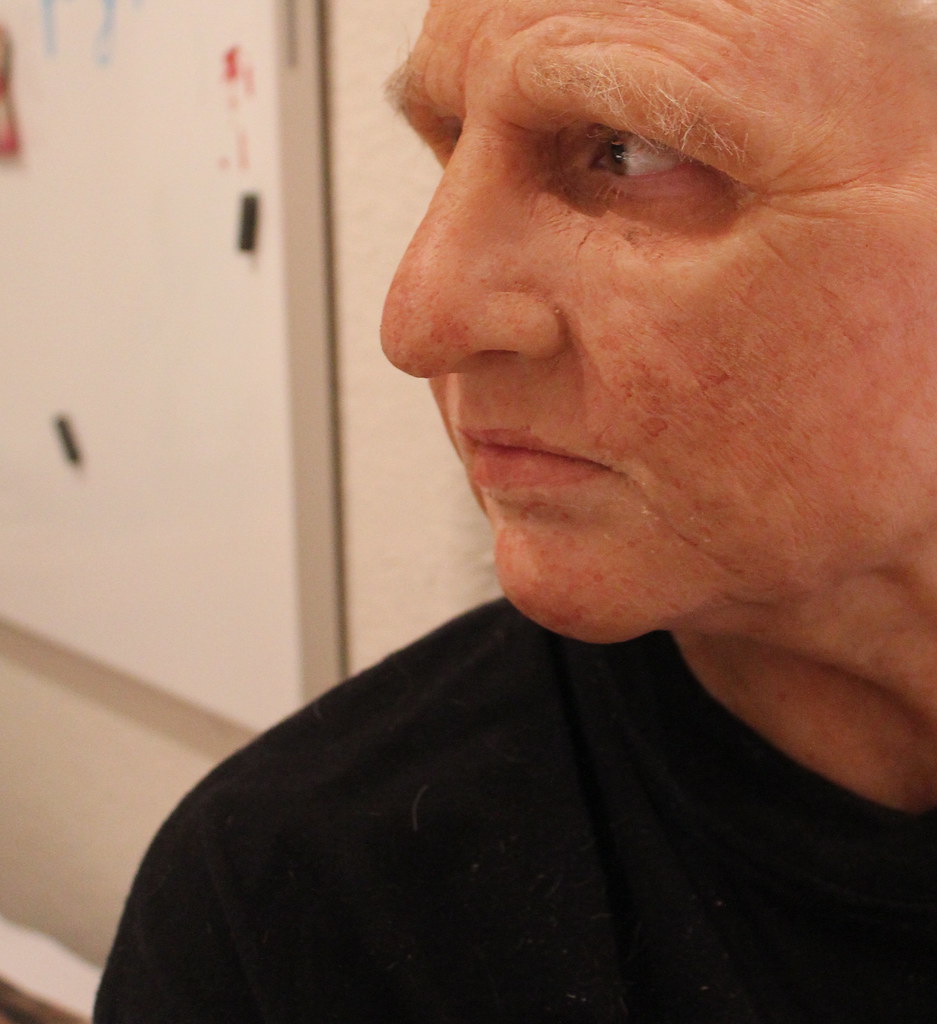
Zombie Makeup Sculpt
Sculpt for a Zombie makeup inspired by KNB EFX Group's work on The Walking Dead.
The teeth here are stand-ins for the real teeth, which will be hard plastic underneath the foam latex "skin."


Tuesday, August 9, 2011
2011 Skins are Finished
Three posts in one week? This has to be a record!
Here's this year's batch of Skins for 3-Axis Skulls ready to be shipped off to their new haunts.

Here's this year's batch of Skins for 3-Axis Skulls ready to be shipped off to their new haunts.

You might see some different faces next year, by the way...
ShellHawk, Mr. Chicken, and Madame Leota... Live!

You don't have to make an account to watch and comment on the live stream, but if you do and you subscribe to ShellHawk's channel, you can get an email notification when we're starting the broadcast.
See you then!
Sunday, August 7, 2011

Monday, July 25, 2011
Old Woman Prosthetic Application
I finally had a chance to finish the Old Woman makeup. This was my first time doing a full face appliance (this one's gelatin) and my first time using Alcohol Activated makeup. I had some problems with edges (as usual), and there are a few things I'd improve with the coloring, but, overall, I'm quite pleased with the results.
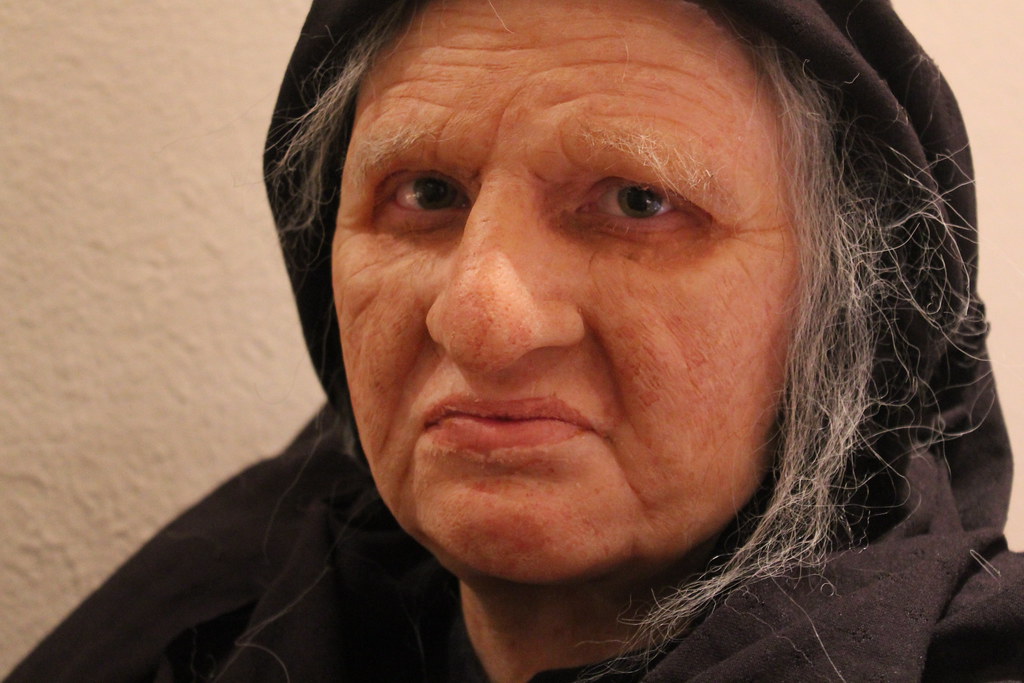
The neck and face moved a lot more realistically than I expected.


This, by the way, is my lovely model.

Subscribe to:
Posts (Atom)