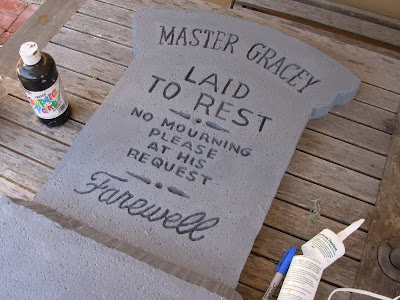
On October 1st, I put out my tombstones, and I figured I'd take the opportunity to show how I make them.
Design: You'll need to create an epitaph, preferably on the computer, and scale it to fit your styrofoam tombstone. Then, use the printout as a stencil and draw the lettering onto the foam. I've already used my Wonder Cutter to cut the shape of this one.

Carving the Letters: Okay, here's the exciting part. Use the heated tip of a hot glue gun to carve the letters into the foam without letting glue out. This works much like a hot-wire cutting tool, but it's cheap and can still be used for gluing. A smaller glue gun enables thinner, deeper cuts. Hold the gun just above the hot area and work slowly along your lines. The width can be adjusted by the depth at which you carve.

The melted foam gathers in these stringy plastic things around the letters. Pull them off carefully or you could damage the lettering.

Paint in the letters with black paint. I used tempera paint (but acrylic is longer lasting). You don't have to stay inside the letters, since the main grey color will go on top.

I use the hot-wire cuttter to make a slot in the back for about ten inches of 3/4" PVC, which is then hot glued in place.

A small paint roller or large paint brush is useful for getting the main grey painted on evenly and without slipping into the letters. If you're using a paintbrush, make your strokes diagonally for this reason. I made my grey paint with some old white house paint and a bottle of black tempra.

Detailing time! There are thousands of ways to bring a little more life into these tombstones. Here, I speckled black and white paint using an old toothbrush (you know, when you pull back on the bristles with your thumb)...

On this one, I put small blobs of black paint at the top, below he letters, etc., and wiped it down with a paper towel. Straight, downward strokes are key.

I'm sure you can come up with may better finishing ideas, but it's the glue gun that I wanted to share.


No matter how well detailed or shaped a tombstone is, I've always thought the secret to it's success is how "pro" the lettering looks. These are fantastic looking. Great tip using...well, the tip of the glue gun.
ReplyDeleteI tend to overwork any tombstones I make, especially in the aging. I'm going to have to try that simple blob of paint and streak down idea.
Thanks for sharing your "Aha a" moment with us. I will use the technique on my tomb stones and block wall mortar joints. Now that you identified the method we all wonder "Why didn't I think of that?"
ReplyDeleteBrilliant as usual!
Congrats from all your friends from HauntForum.com
Aquayne
Wayne Johnson
Just a heads up: melting foam is highly toxic. It actually creates cyanide gas. If you should do this, it should be done outdoors with a fan blowing the fumes away from you. A respirator doesn't hurt either.
ReplyDelete