A lot of pictures on this site were hosted on Photobucket before they disabled photo embedding. If you'd like to see pictures for a particular post, please let me know, and I'll prioritize getting those images fixed next!
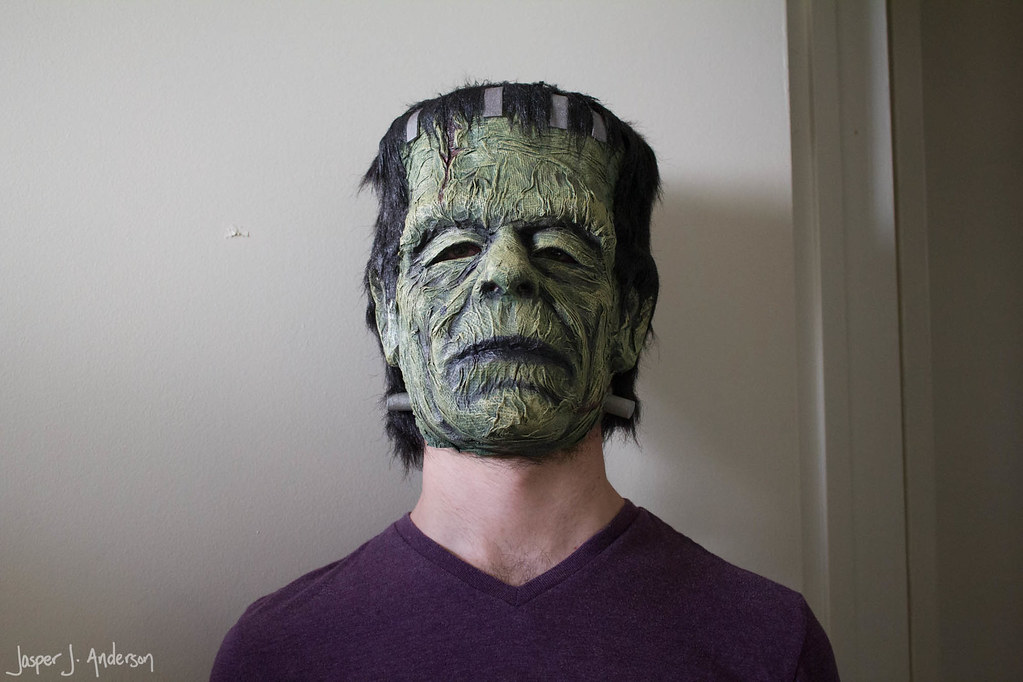
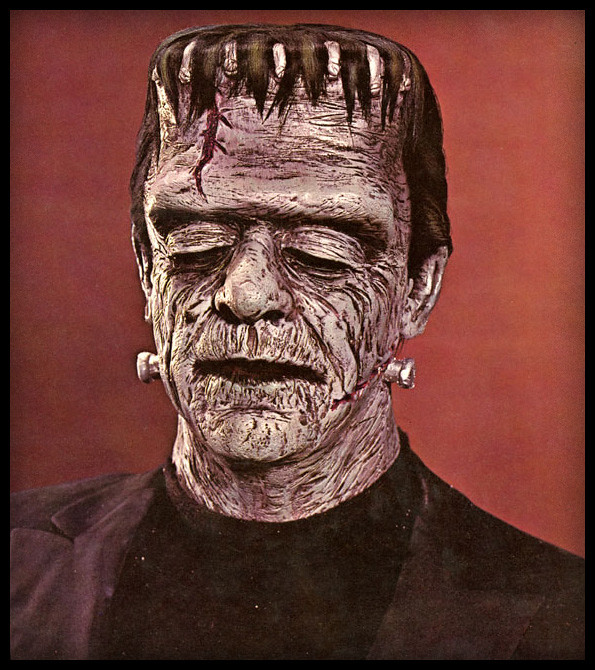
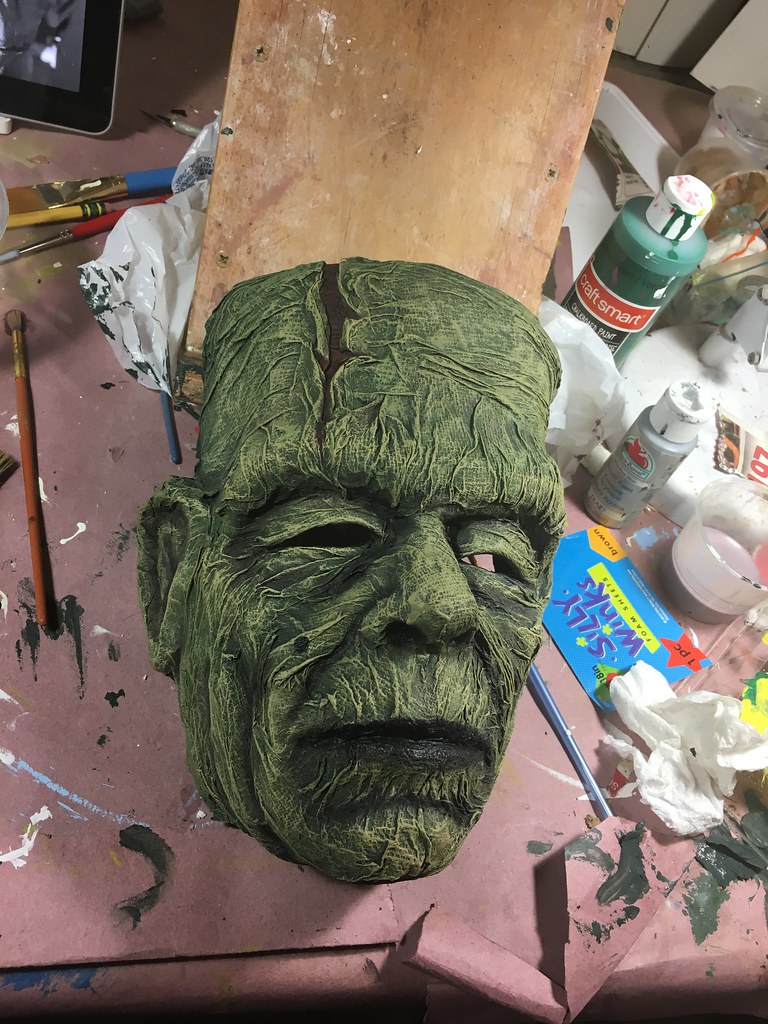
I really got the mask making bug doing those retro monster mask repaints. While I was working on the Frankenstein, an idea finally gelled that had been floating around for a few years now. I had the sense that, with his strikingly textured face, Glenn Strange's incarnation of the Frankenstein Monster would lend itself beautifully to my wacky zombie corpsing technique.
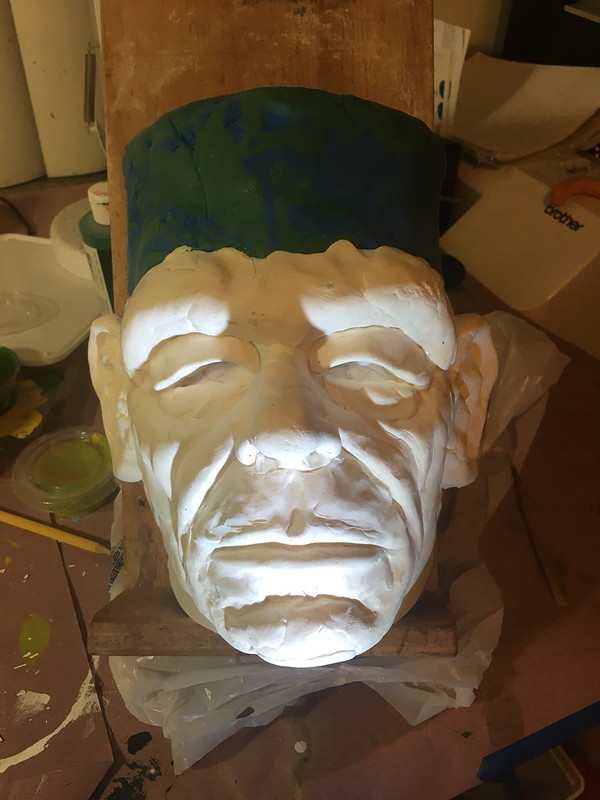
I had originally envisioned doing a full bust of the character, but, at 11:30pm on a Monday night, I realized it had to be a mask, so I pulled out some clay and got to work.
I used some Model Magic clay that I had kicking around on top of a reject casting of Sybil the Clairvoyant. At this point I was imagining that I would leave everything attached to the hollow Sybil face as the structure for the mask, but I realized after I finished sculpting that it would be too heavy with the amount of clay required, so I slathered the sculpture in vaseline to release it from the subsequent layer of paper mache. Had I known it would go this way, I would have used a non drying oil clay. It would have released itself from the mache mask and been easier to work with. Oh well.
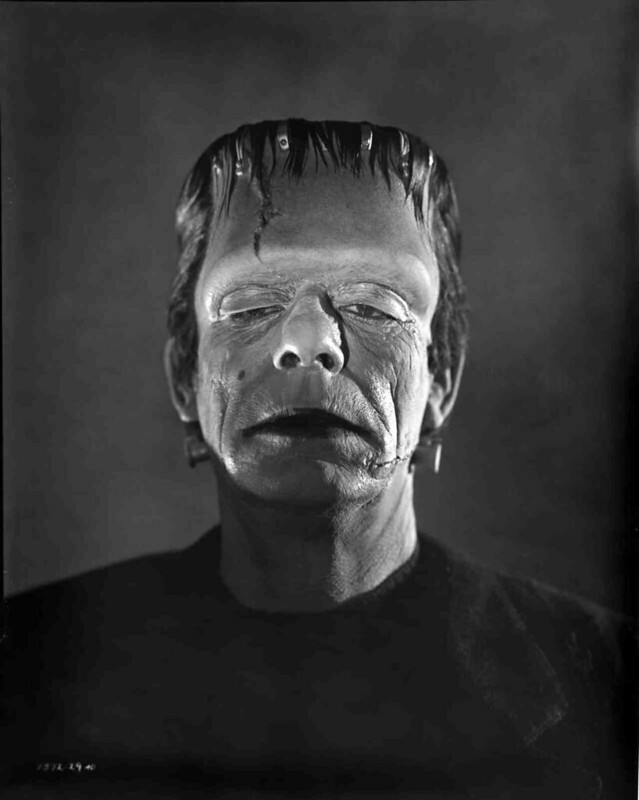
I didn't worry about getting a perfect likeness, because my other source of inspiration, besides the movies themselves, is the fantastic Don Post "Calendar" Mask of the character, which has its own over the top exploration of the design, and only almost hits the exact likeness.
Two layers of newspaper and thinned school glue make up the shell of the mask itself. It gives it structure, but isn't totally rigid, which is kind of nice in a mask.
Then two layers of "chicken mache." The first one smooth for extra structure, the second with all the wrinkly goodness. Check the tutorial linked at the top of the post to see how it's done.
And then we paint. drybrushed pale green highlights and thinned down, washy purple shadows. What color is he supposed to be? I don't know. You can't forget the Glenn Strange mole, though!
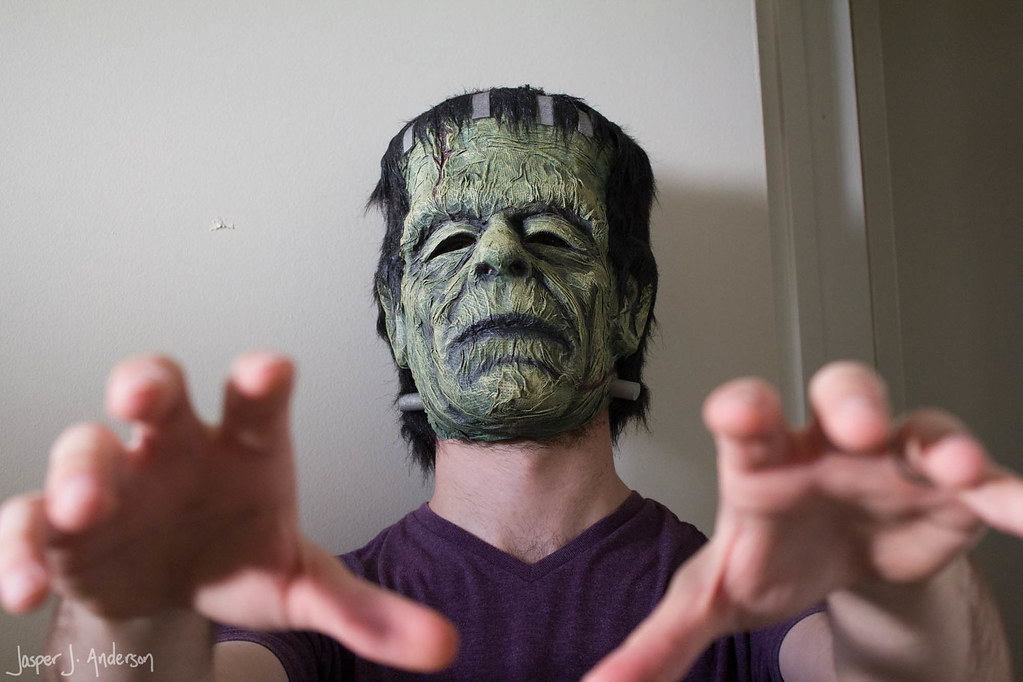
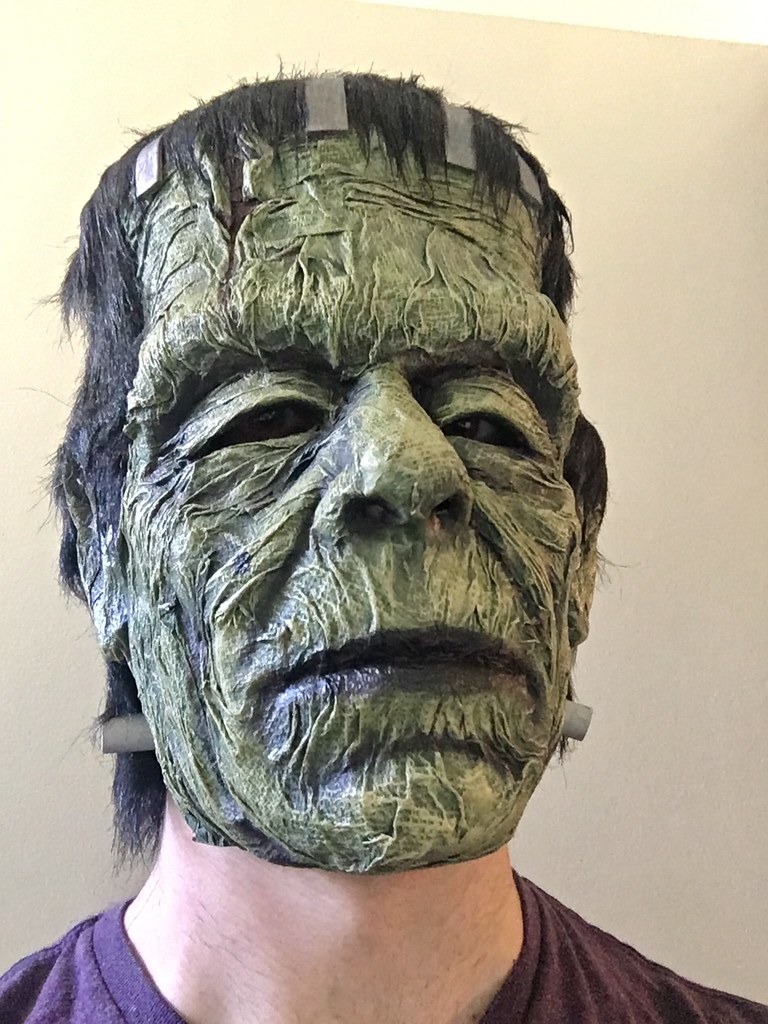
From there I added hair, monster hardware, and an elastic strap.
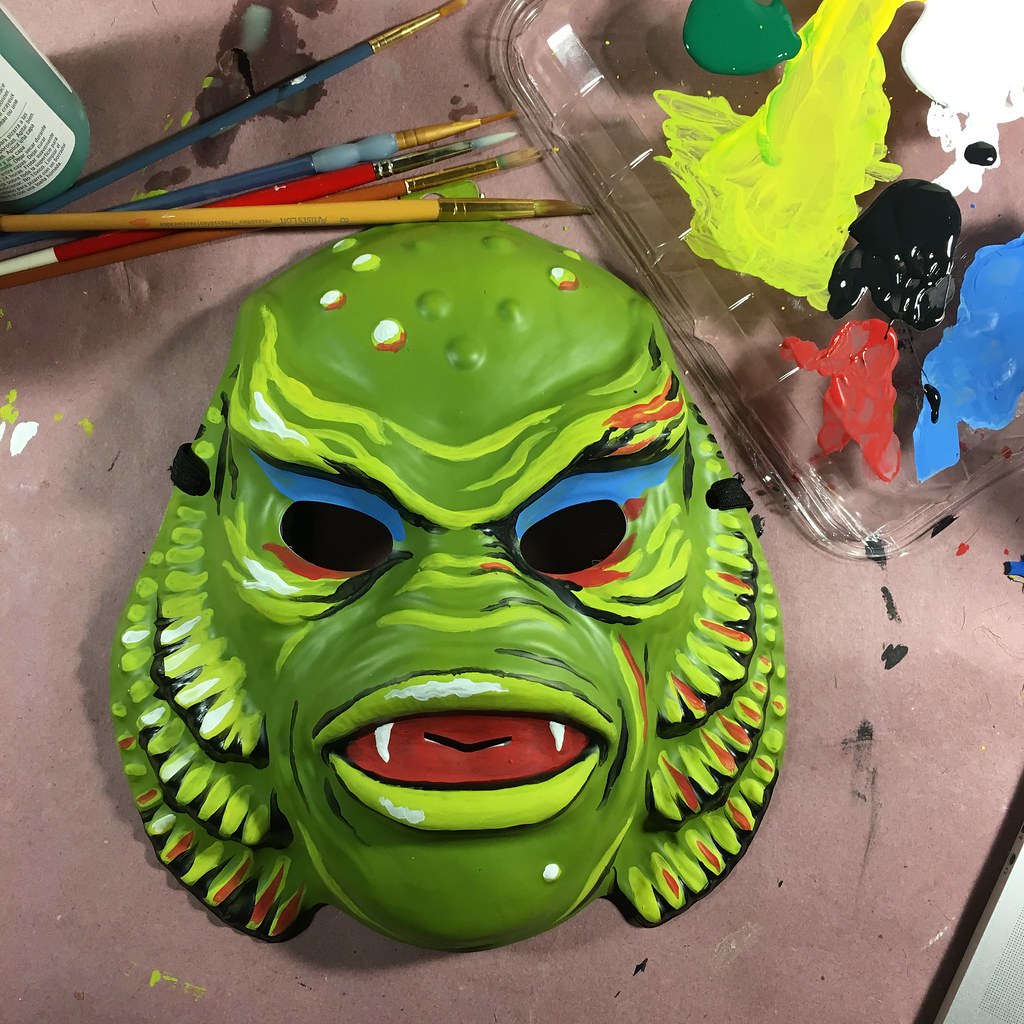
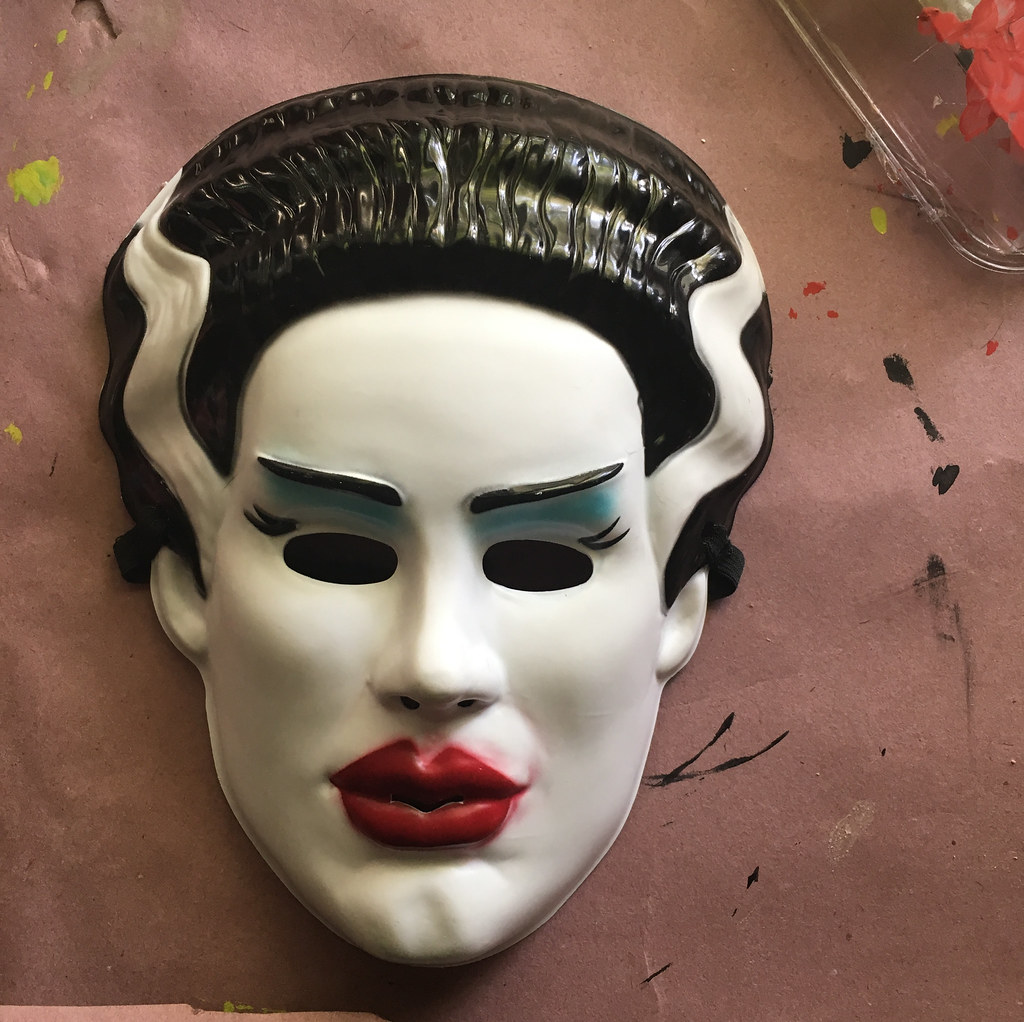
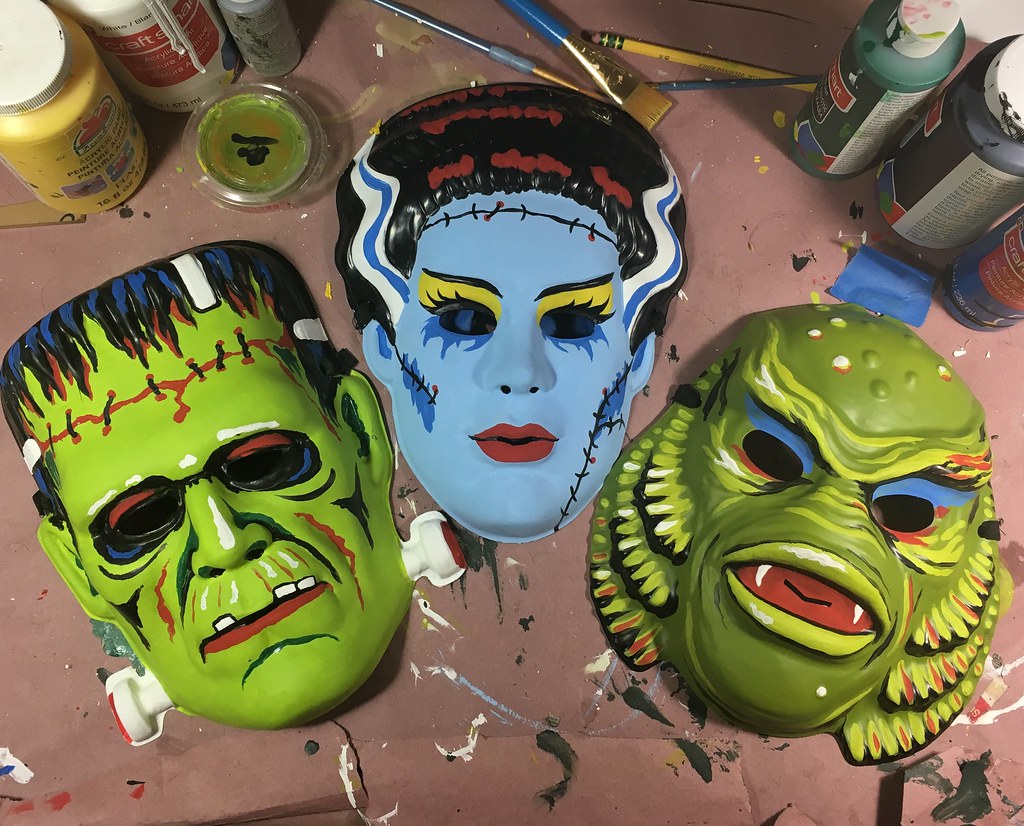
Target put out a line of Universal Monsters themed Halloween products this year, and what caught my eye was the cheesy vacuum formed plastic masks. They had the bones of vintage Ben Cooper and Collegeville Halloween masks, but the paint job was lacking.
I picked up the Creature from the Black Lagoon to have a go at painting it up retro style. This one had a really cool vintage counterpart with an almost identical sculpture from Collegeville, so I had a clear direction. Here's the before and after.
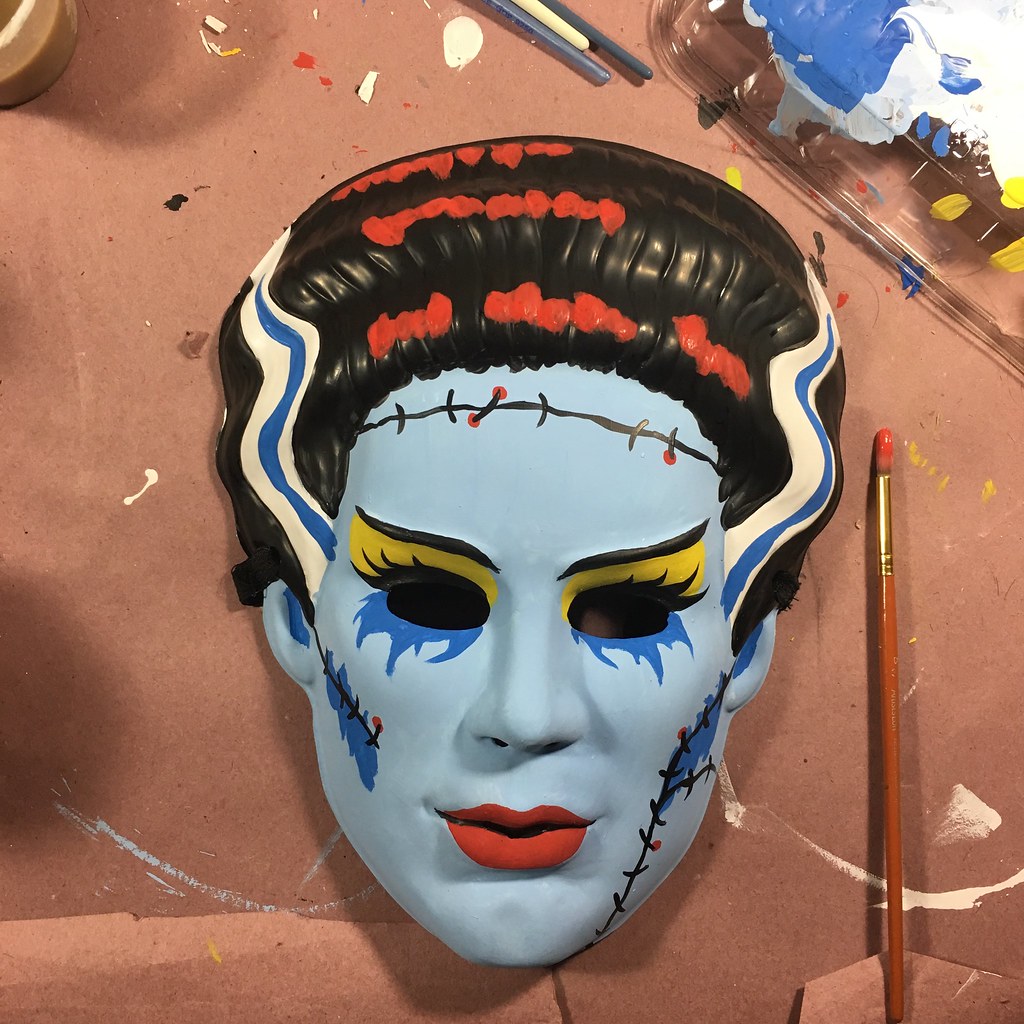
It was pretty fun, and the Instagram kids seemed to dig it, too, so I sought out the others. I found the Bride of Frankenstein next. Turns out the vintage paint jobs on these were just about the same as the new one. Snooze. So I pulled from some vampire lady designs, as well as the Frankenstein ones to come up with what hopefully comes across as wild yet pretty. It's certainly prettier than the factory paint job, so there's that.
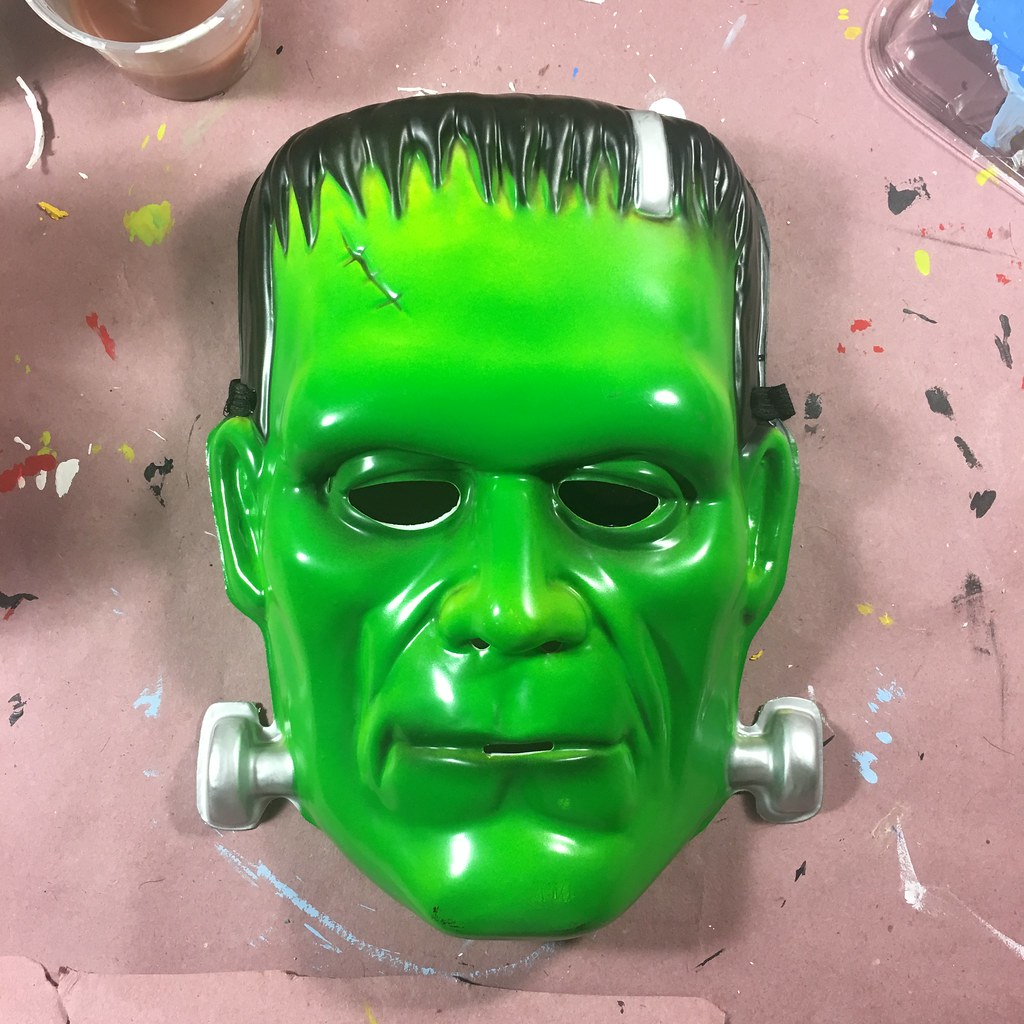
I had to order the Frankenstein Monster, as it was all sold out locally. This one is sculpted pretty boring compared to the old ones, but we can save it in paint!
Or: Jeepers Creepers, Why Are Your Peepers Moving?
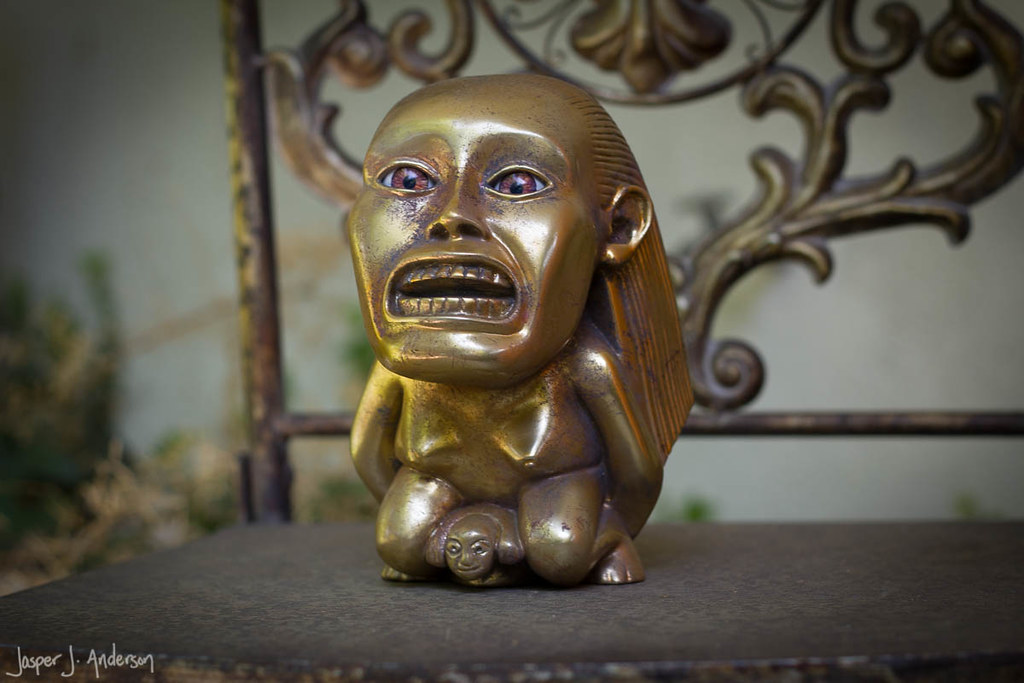
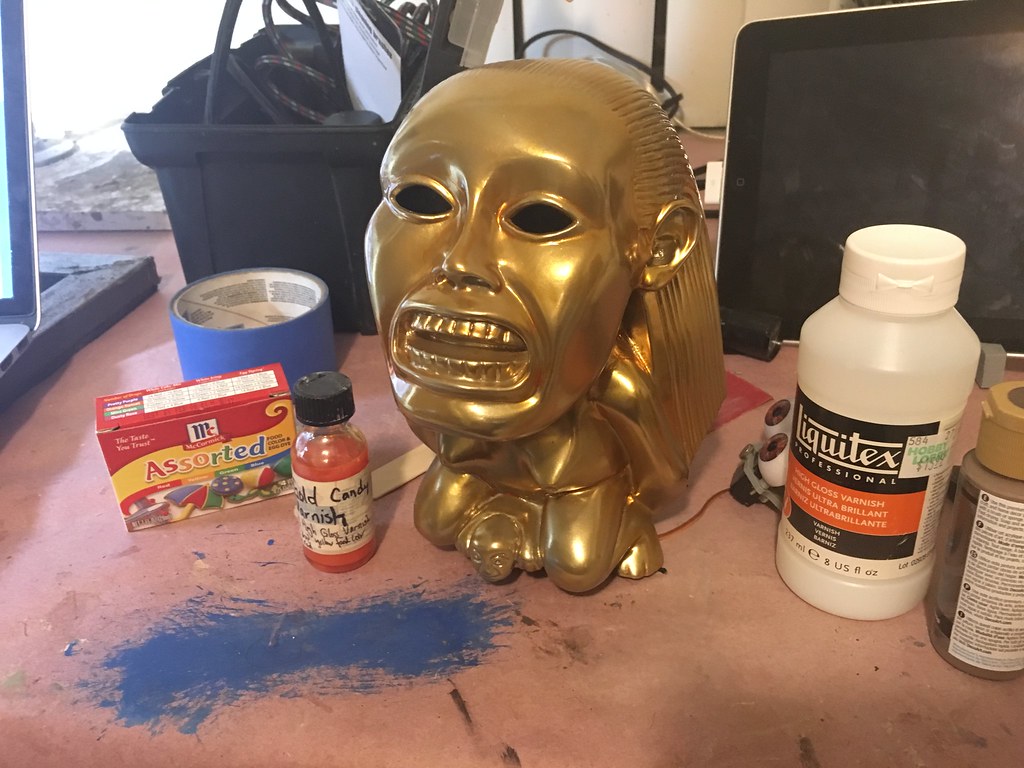
You may have noticed I've got a thing for movie MacGuffins. One of my favorites has always been the golden statue from the beginning of Raiders of the Lost Arc. The stumbling points that have kept me from it are acquiring a decent casting of the real deal (they are out there), and figuring out a solution to gold plating it. But I think I got a satisfactory solution to both, so here's my process.
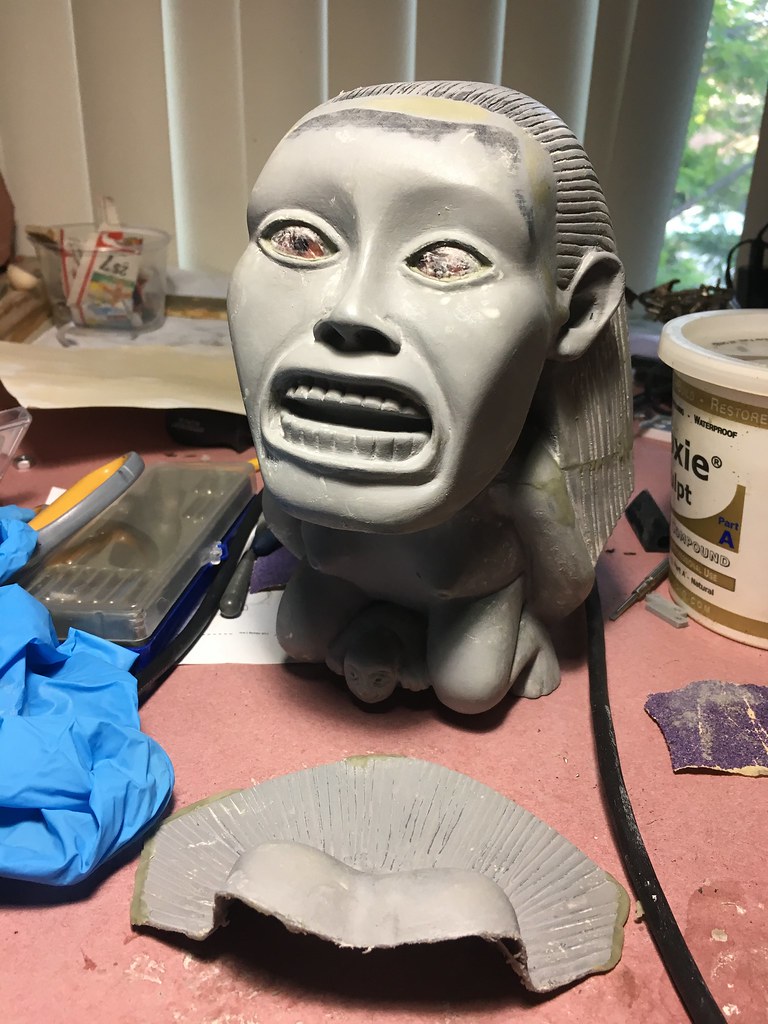
First problem solved: Someone appears to have scanned a (perhaps modified) copy of the stunt version of the idol on Thingiverse. So that's handy. The only thing is the stunt version has a different expression, and this one has some other quirks. If I were more of a digital whiz, I'd have fixed it in the 3D model, but I printed it as is and modified it after.
I like to give my PLA prints a rough sanding right off the bat.
Then a coat of filler primer
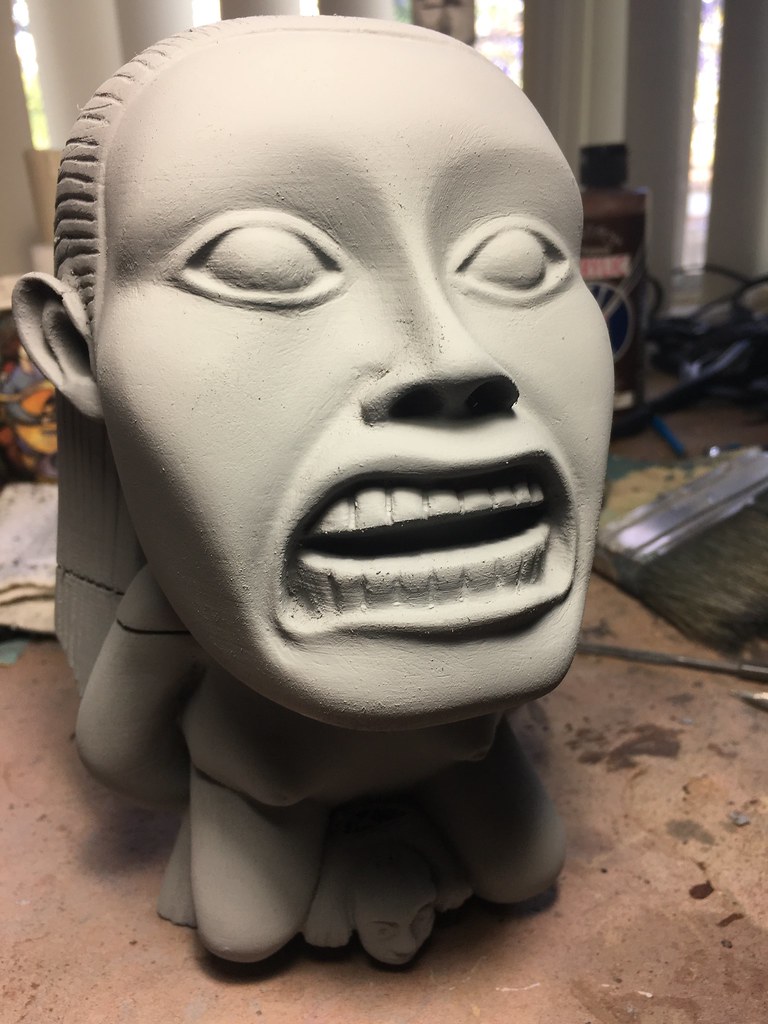
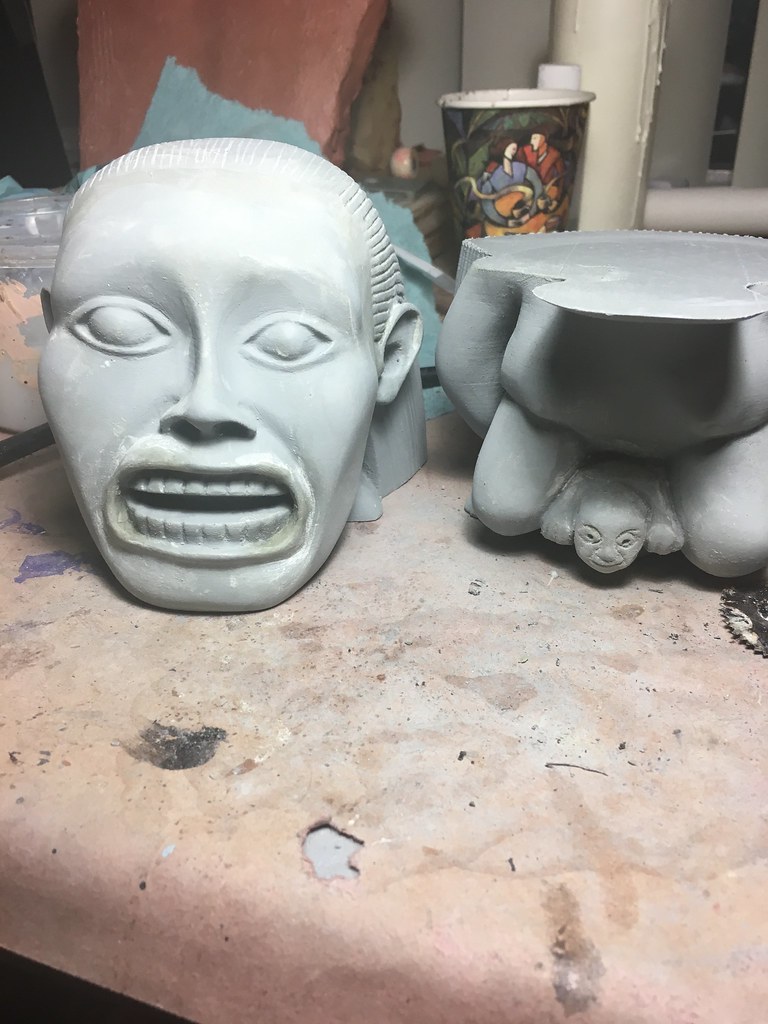
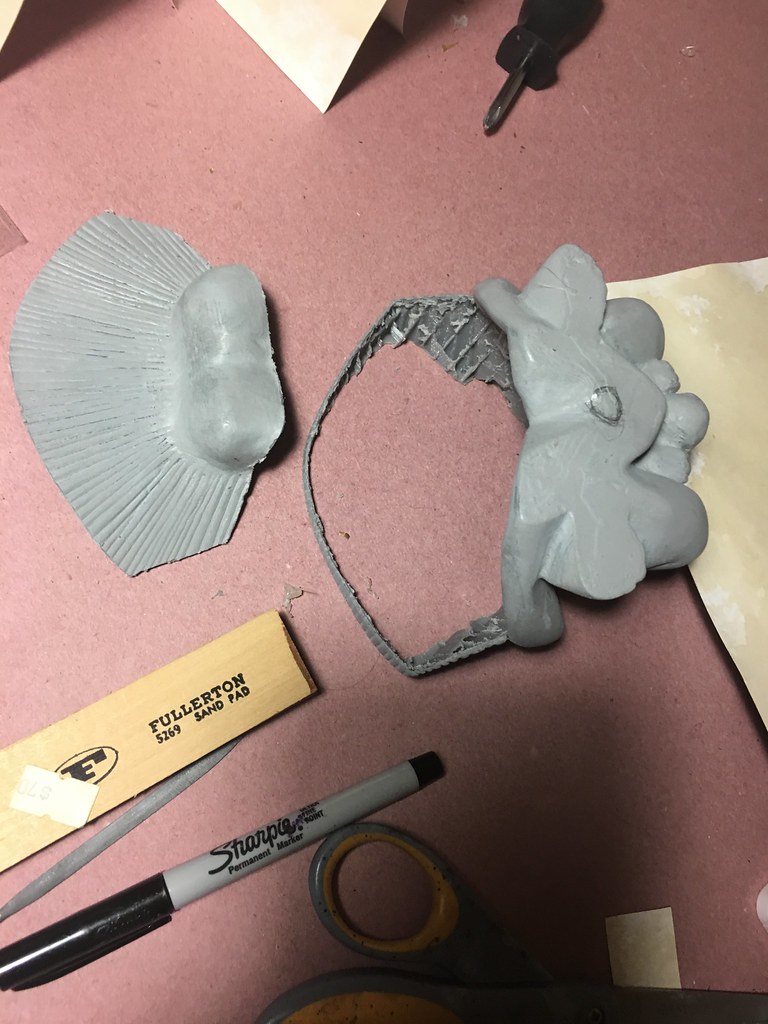
The primary issues here are the downturned corners of the mouth, the face of the baby, and the hairline.
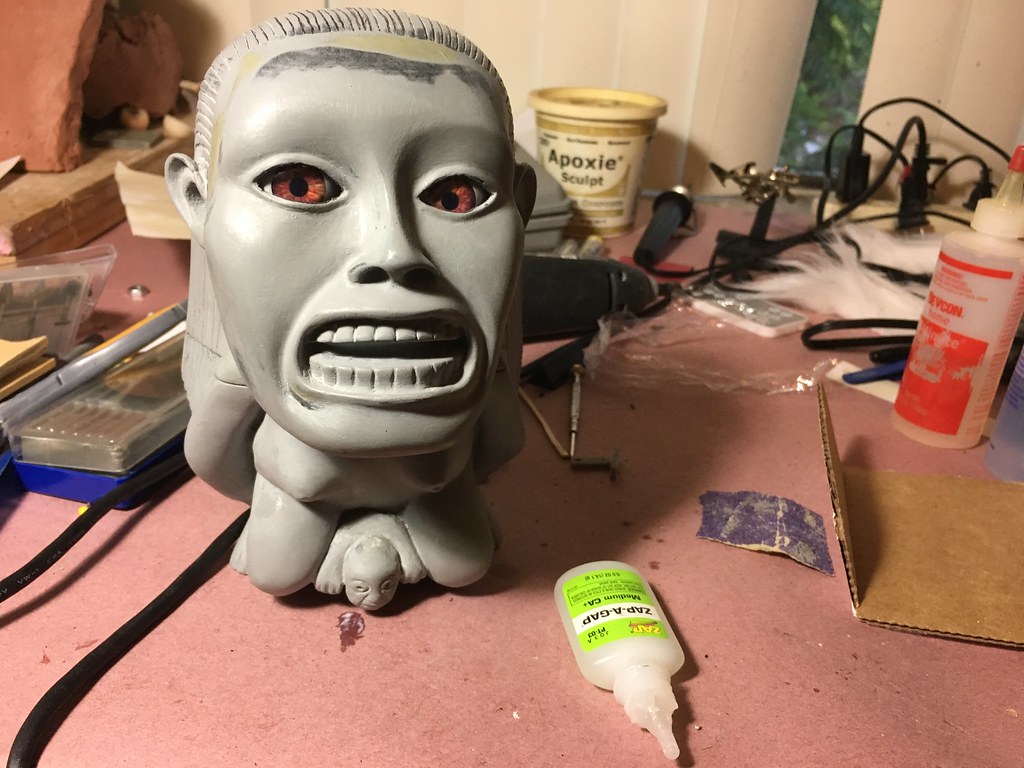
After a few passes of primer and sanding, I corrected those with Apoxie Sculpt, which is an epoxy putty that sets up in a few hours and is nicely sandable.
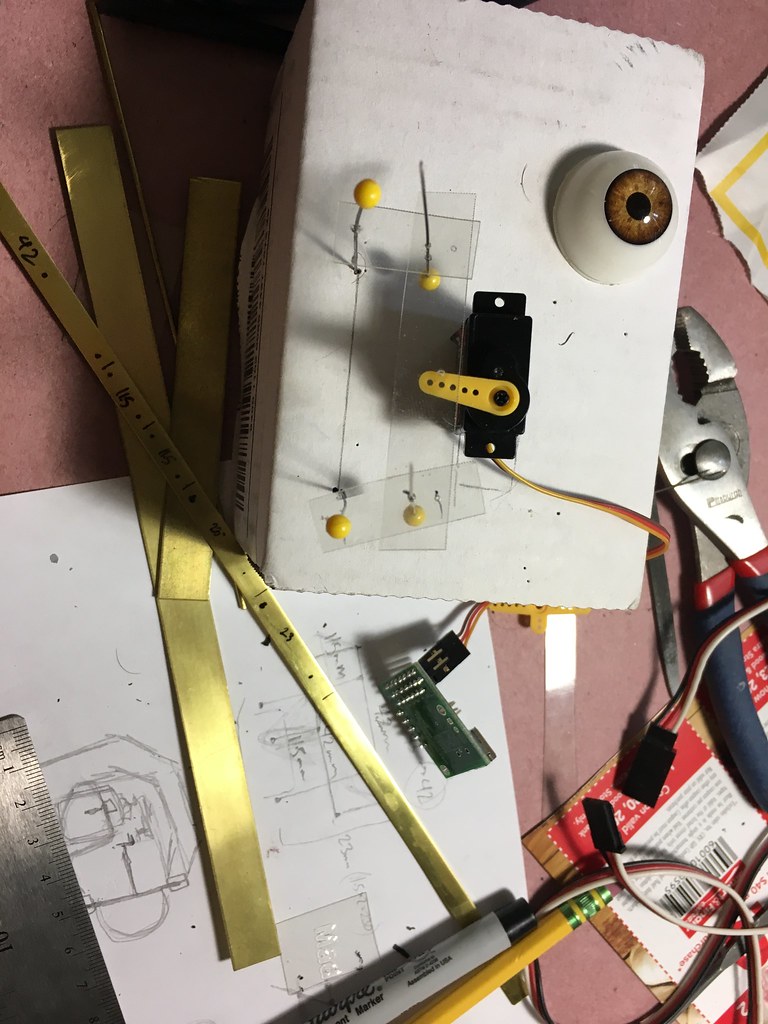
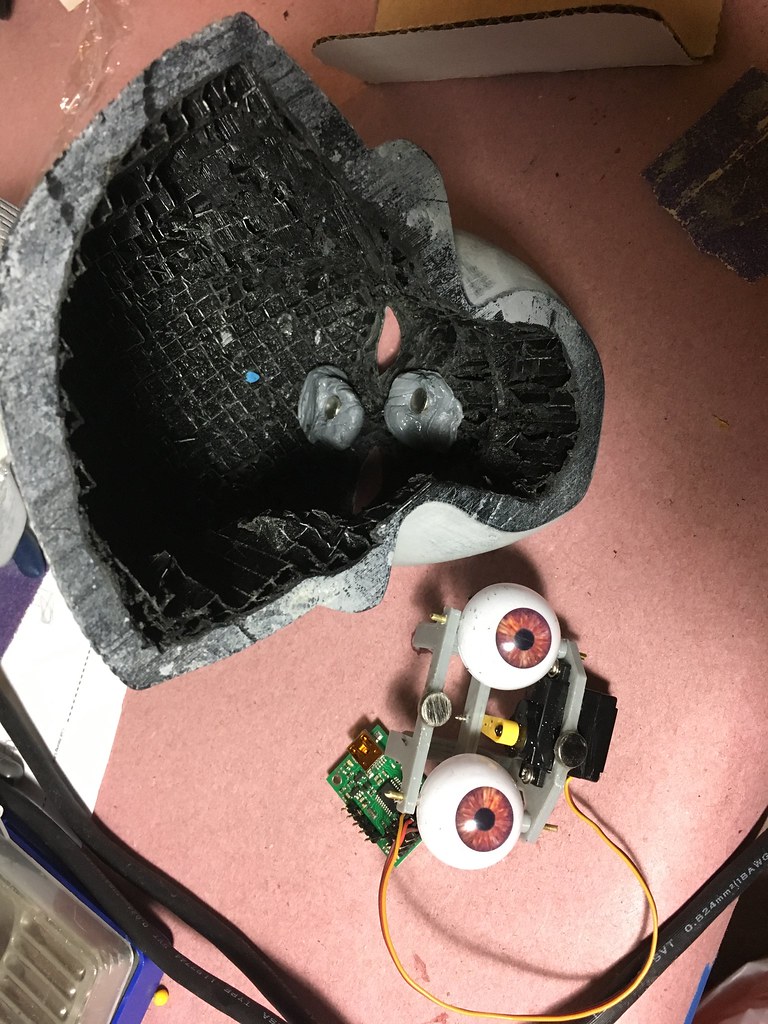
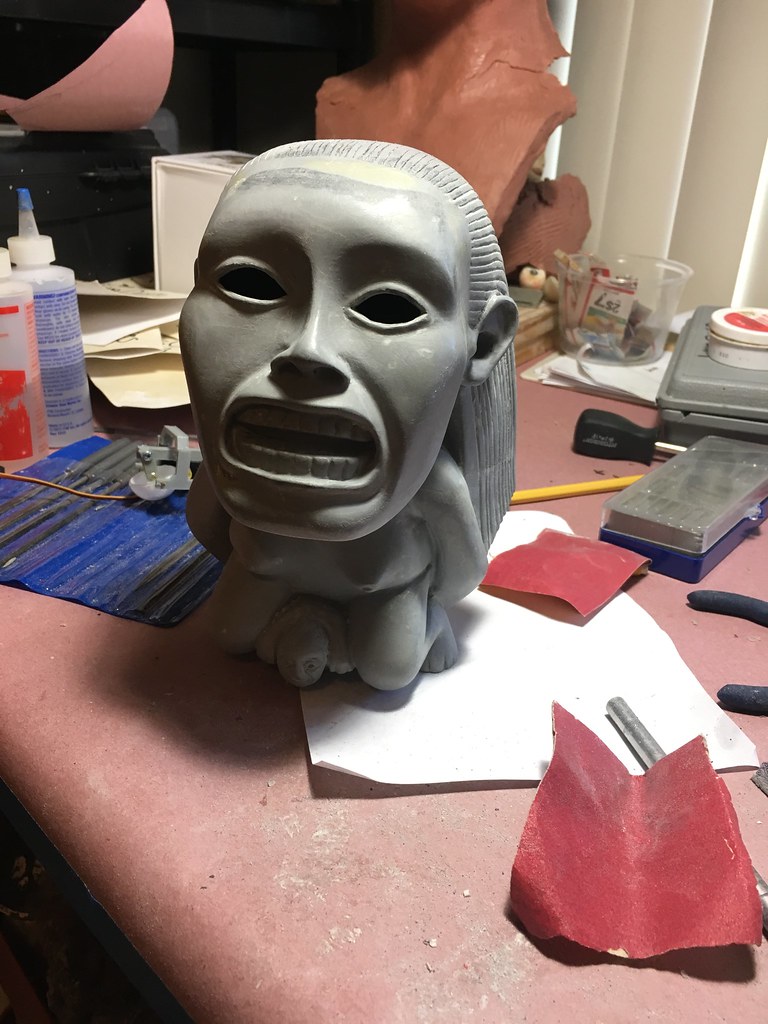
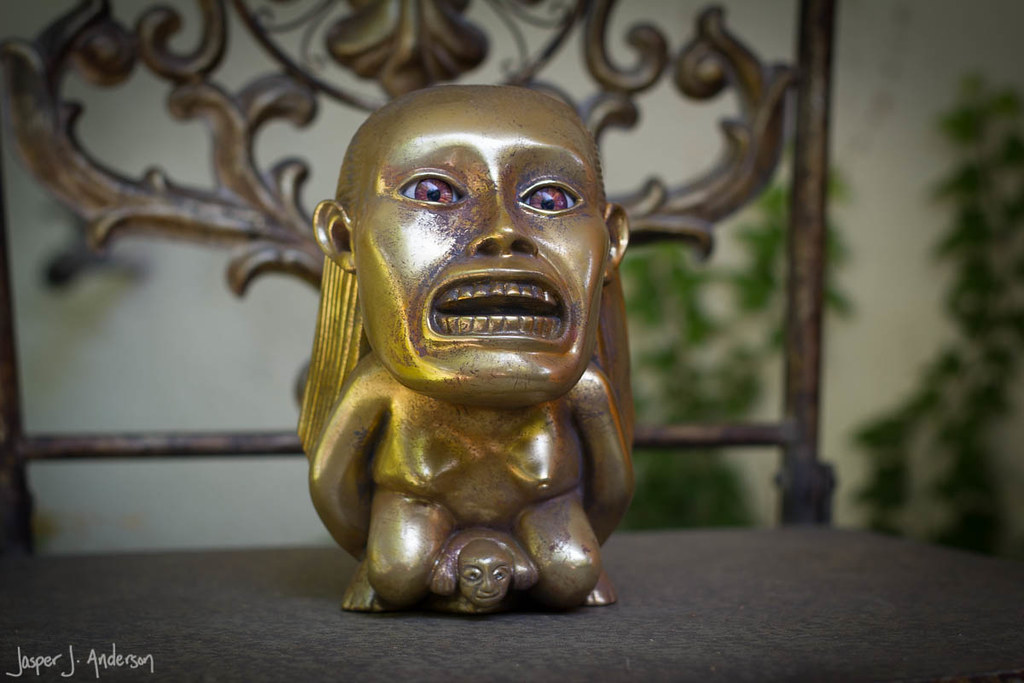
Now once I got this far, I figured the project might actually turn out all right, so I started thinking I might as well take it one step further. Most people have never noticed, but the eyes of the hero prop in the movie were not only glass humanlike eyes, but moved back and forth. I had to take the challenge.
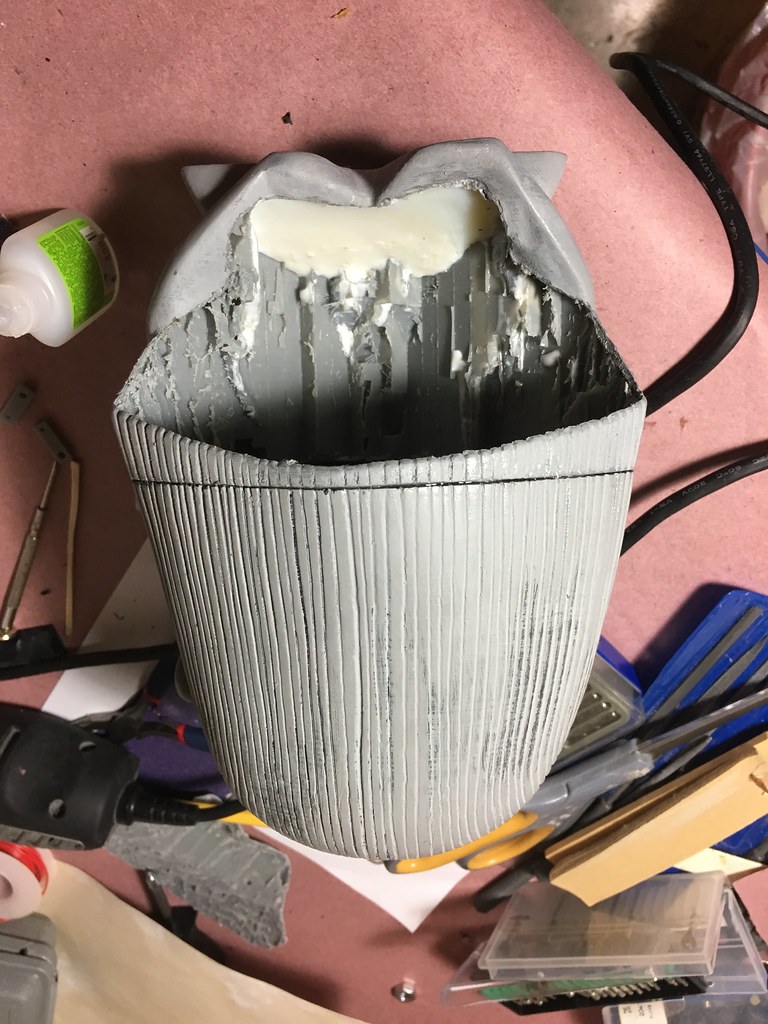
If I had planned it this way from the beginning, it might have been easier, but I didn't, so it wasn't. I had to dremel out all the support material from the inside to fit an eye mechanism.
I ordered several different plastic eyes to decide what would work best. The one you see below was my favorite looking, but I ultimately decided to use another without a corneal bulge, because a totally spherical eye would be able to fit tighter to the rigid eyelids while they're moving.
I prototyped out the mechanics with some pins and scrap plastic. The actual design had the servo on the other side.
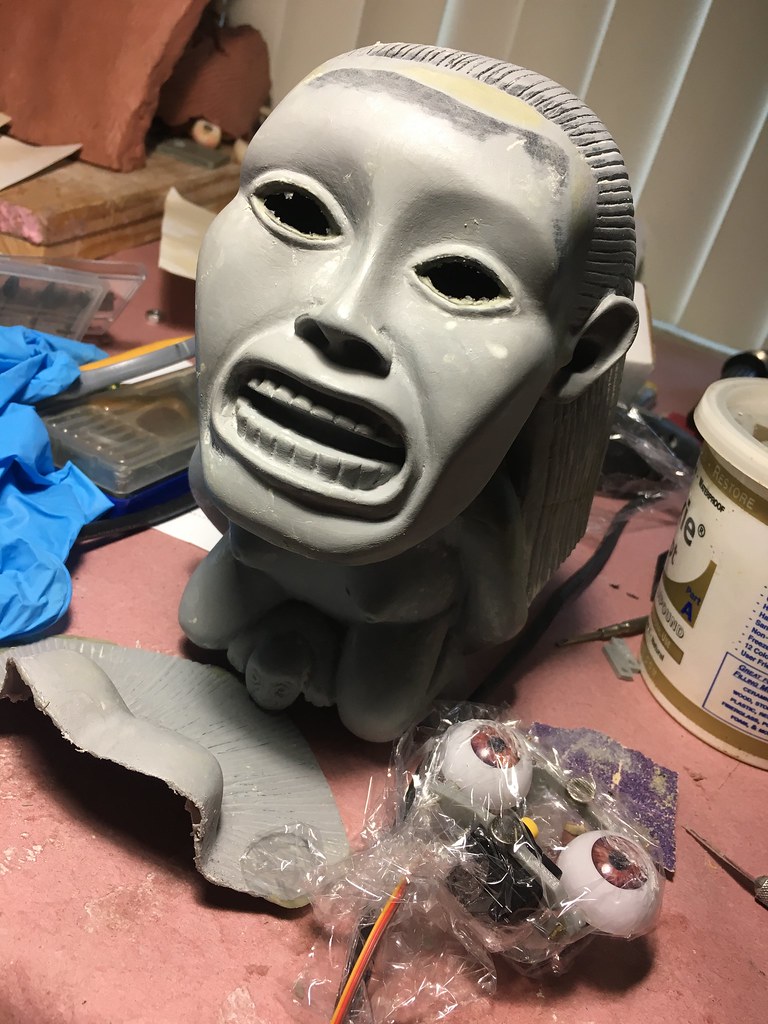
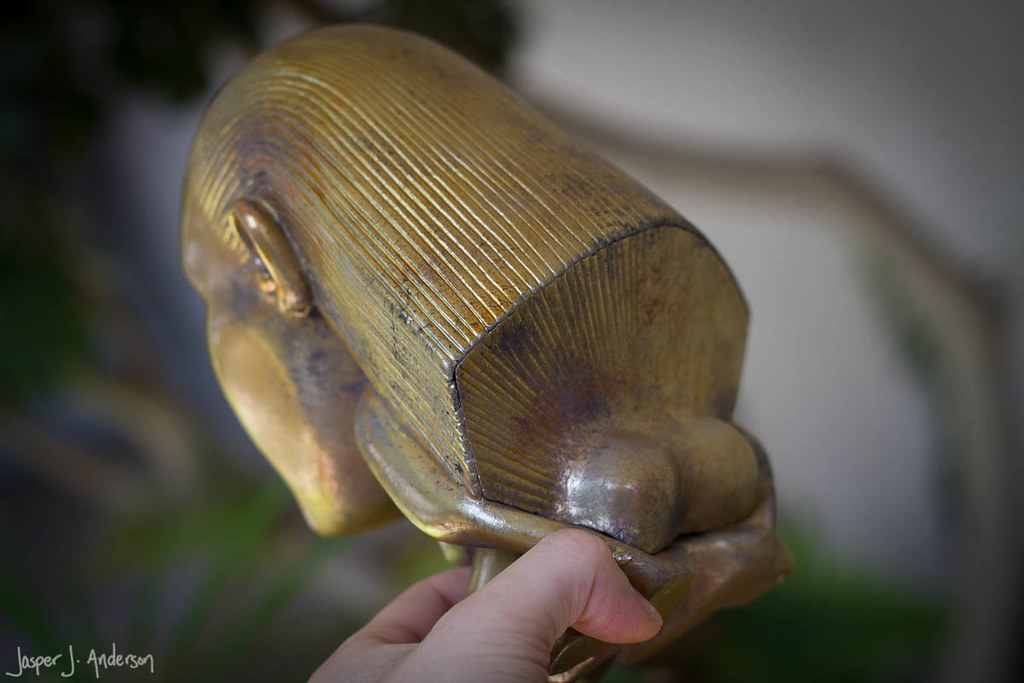
One of the puzzles I wanted to solve was the hatch to access the mechanics. The original had a somewhat awkward cut across the top of the head so the whole back of the head could come off. I wanted to avoid anything conspicuous, so I devised a door on the underside of the hair. This is where having the model in two pieces worked to my advantage, because I could have easier access to the back of the eyes to set things up initially.
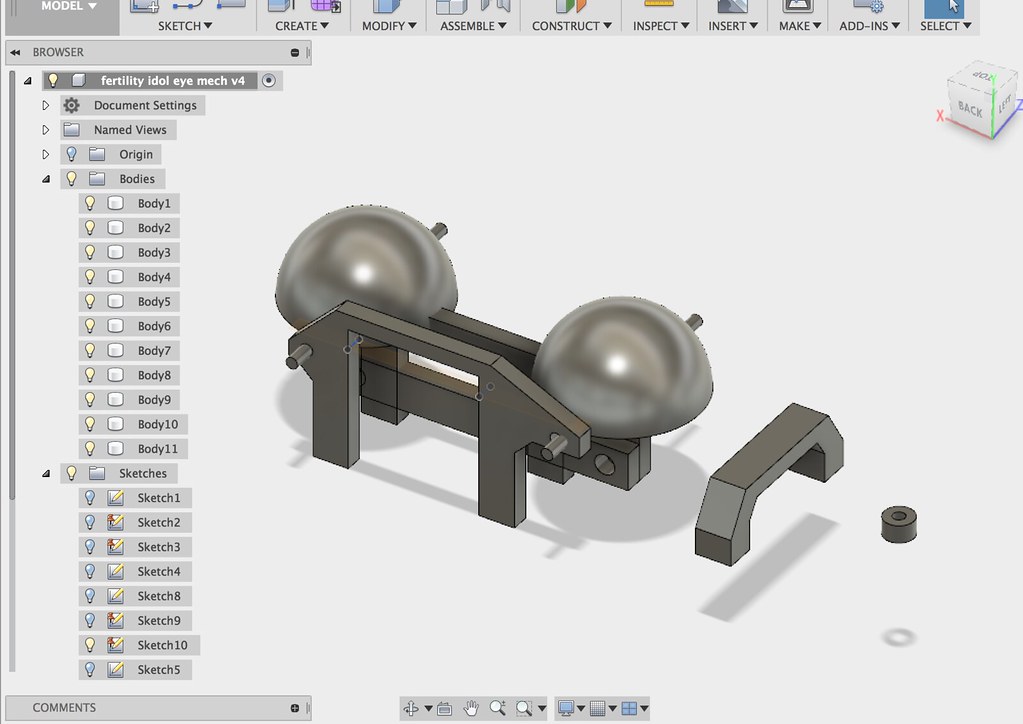
I had originally planned to build the eye mech out of brass stock, but I was inspired by the mechanical designers I've been working with at the ol' 9 to 5, and I ended up modeling the eye mech in Fusion 360 for 3D printing. The first time I built it, the eyes were just a hair too far apart to seat correctly, so I had to redo it, which is fairly trivial when the computer is doing most of the work.
When I got it how I liked it, I mounted the whole mech inside the head with magnets. There were two reasons for this. 1) I wanted to be able to easily remove the mech if needed, and 2) I wouldn't be able to get any conventional tools up there once the body was sealed up. Okay, 3 reasons. 3) I like magnets.
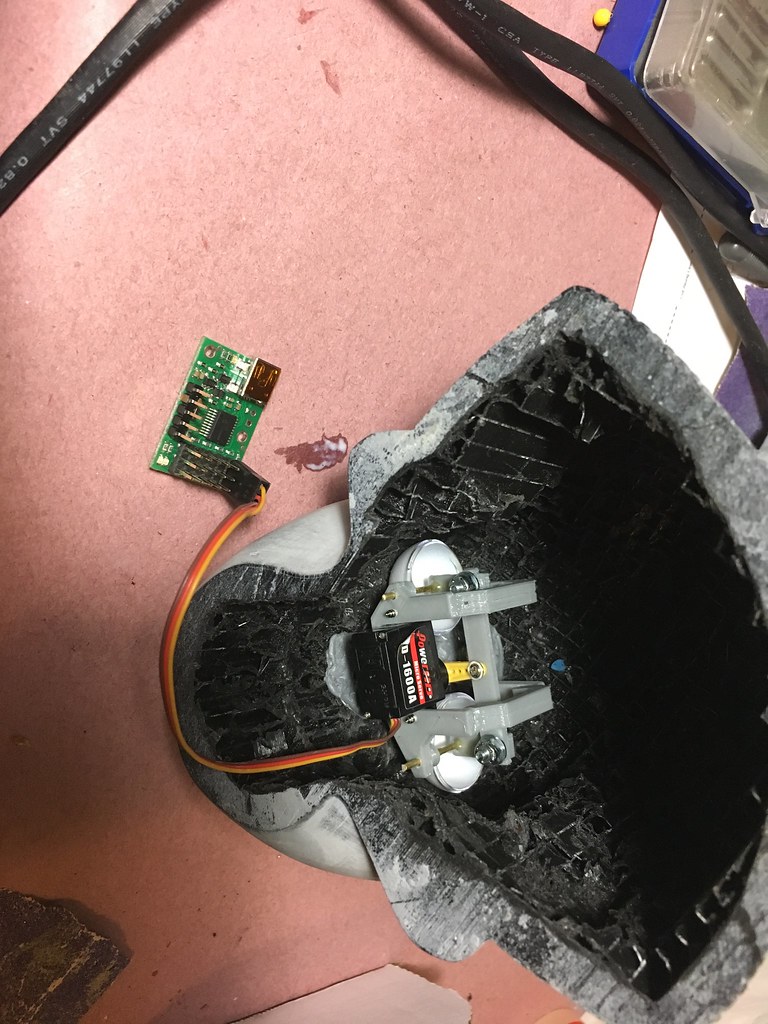
I 5-minute epoxied the magnets to the mechanism, and then used propoxy to mount the ones in the head, using a bit of plastic wrap as a barrier. You can see the controller board here. It's a Pololu Micro Maestro. I've become fond of these for this sort of simple animatronics control. It's small and, unlike an Arduino, is designed for smooth servo movements. The software is not as easy to program as VSA, but that's the tradeoff for being self-contained.
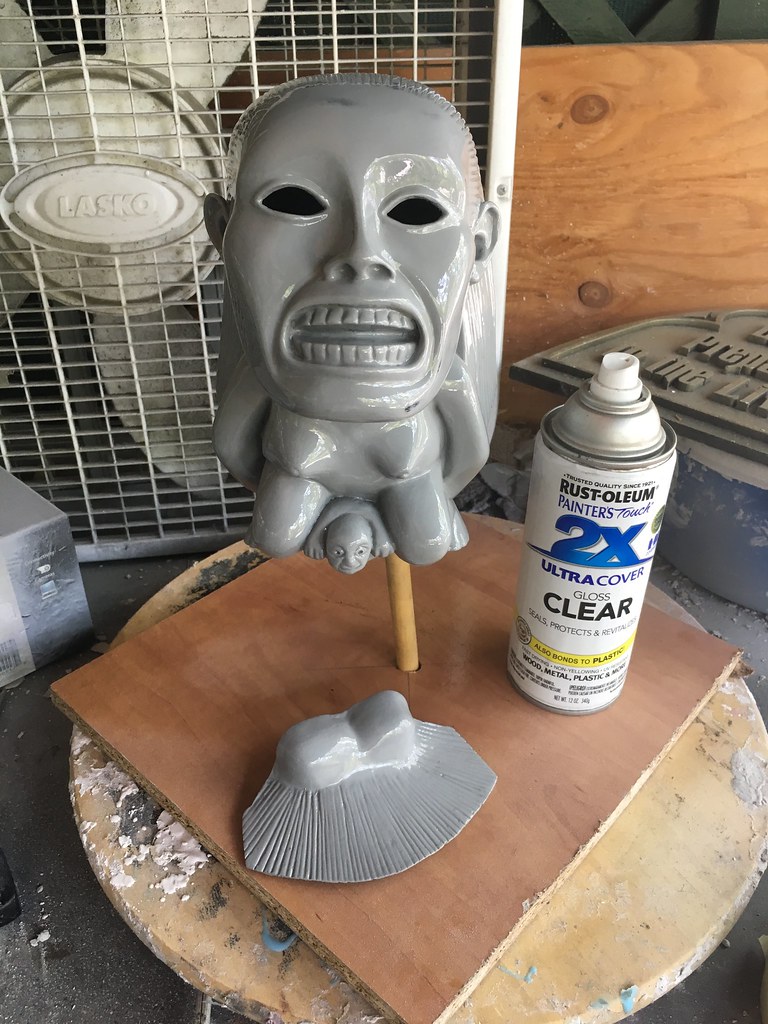
At this point I could superglue the two halves together.
I poured some resin in the feet to weight the bottom so it would be a little less top heavy.
Now there's just enough room to guide the eye mech until it snaps into place. The system works pretty well.
The eyelids needed a little resculpting to fit cleanly around the eyeballs. I wrapped them in plastic wrap before inserting them back into the head, and using Apoxie Sculpt to fix them up.
I also worked on the seam between the two parts, and the join on the trap door.
Nothing's a one step process. You can see even here there are print layers that can be seen and seams that need another pass of patching.
That hair took a lot of going over with a small, triangular file (thanks, Harbor Freight).
When I finished bodyshopping, I went into glossing it up. I decided at this point that I could get it chrome-enough with Alclad chrome model paint. As for the gold color, well, one step at a time. Now, I've always been told to do chrome paint over a black glossy base. The problem I've had with that is that you can't go too heavy with the Alclad, or it loses the reflectivity, so there's always sort of a darkness to the chrome from the black base. I went ahead with just three coats of gloss clear on the assumption that a glossy grey would lead to a brighter silver.
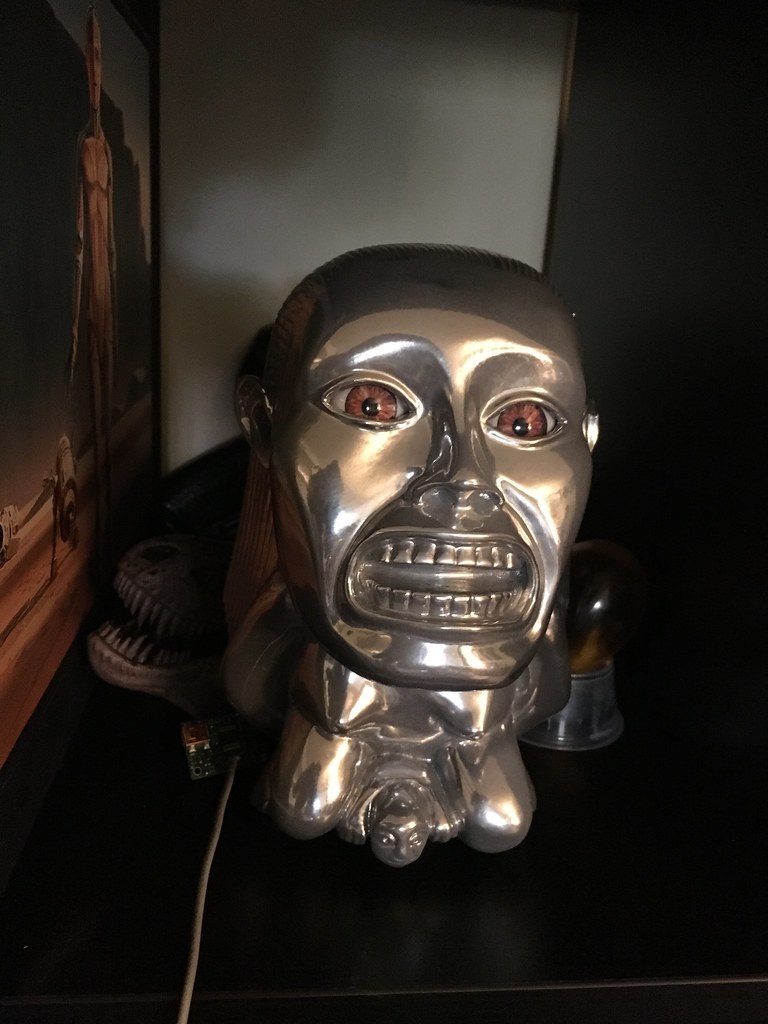
There were a few spots where I had sanded down to the black PLA before clear coating, and sure enough, I could see those through the chrome as darker chrome areas, so the grey experiment worked. The other bonus of a grey under layer is that, should the chrome rub away (and Alclad will tend to do that, though I've started applying it before the clear coat is totally dry to help it grab hold), a little exposed grey won't draw nearly the attention of a black spot.
The Alclad will never be 100% mirror chrome, especially with a rattle can gloss coat, but it's a lovely approximation.
So then I started figuring out how I'd tint it. The tricky thing is that most clear coats disrupt the reflectivity of the Alclad. I think it has to do with solvents causing the tiny metal flakes to shift out of alignment and/or not allowing light to pass straight through.
There's a "golden yellow" candy color that Alclad sells, but I found it to be too strongly pigmented for this. Eventually I stumbled upon a video by Gordon Tarpley, in which he suggested Liquitex Gloss Varnish (I used High Gloss) mixed with food coloring. Airbrushing this gave the best results in my small scale tests, so I went for it.
On the actual prop, however, the varnish would dry in one spot before I could get the whole peice wet, which meant it wouldn't level out smooth unless I really flooded it, and I didn't want to do that because more paint meant more intense color, so I ended up doing a top coat of just the varnish to bring back the shine. I did get some drips (which surprisingly don't show up much in the picture above), but I planned to do some weathering, and I figured I could just cover up the drips then.
I followed that up with a weathering pass of a few shades of acrylic sparingly stippled on with a chip brush.
Now, the end result is definitely not chrome gold, but it's surprisingly convincing as polished metal in person. I think the weathering pass gives a matte contrast to the gold that sells it. And the hatch in the bottom is barely noticeable when on battery power. If I want to run it off wall power, the cord can fit neatly in the slight gap at the bottom of the hatch.
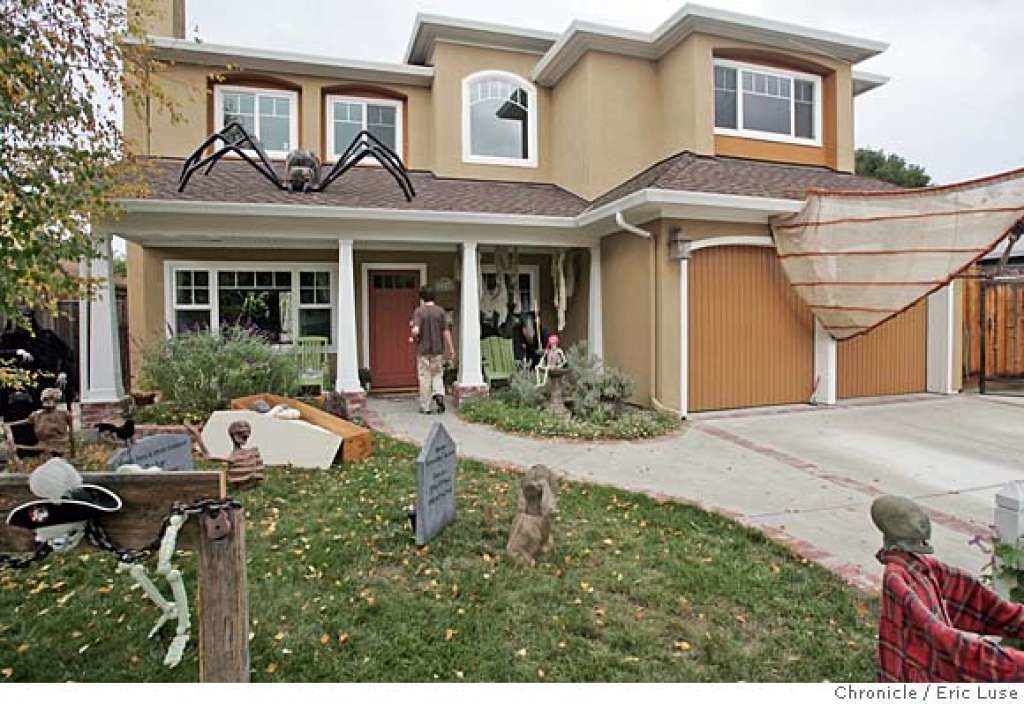
I don't believe I ever posted about my article in the San Francisco Chronicle from 2007. This was on the front page of the Home and Garden section. Reproduced here for your enjoyment. It's not entirely accurate, but that's okay. May I also direct you to my photos from that year's setup to give a better perspective of what it was actually like?
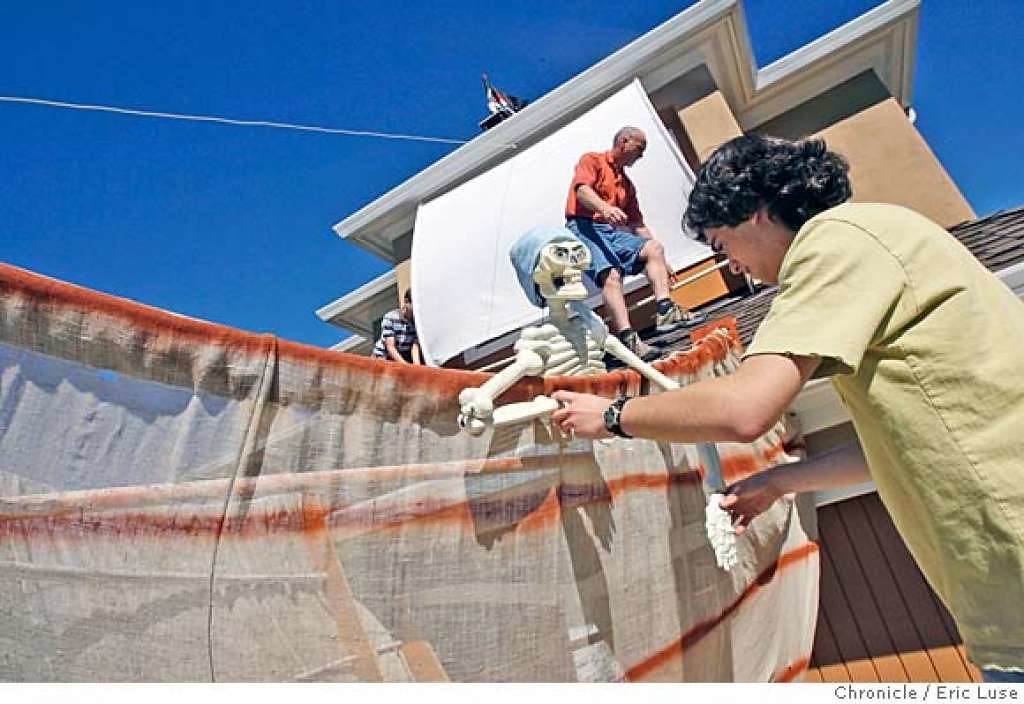
After recent rains Jasper retouches some of the paint. Jasper Anderson,16, Redwood City with his Halloween robotic display at his home. Eric Luse
The Skeleton's Hand a Redwood City family's homemade haunt
It looks scary, but this Redwood City teen's annual haunt is really a warm and fuzzy family affair
Susan Fornoff, Chronicle Staff Writer
Published 4:00 am, Wednesday, October 31, 2007
Gawkers have been up and down Maryland Street for the past month, straining to hear the silly pirate jokes out of the mouths of skeletons Vern and Walter, watching to see if Will the mummy would rise from the dead, wondering what Maggie the witch is stirring in her steaming cauldron.
And, oh dear, what will costumed visitors have to do to earn a treat tonight? That's all up to the unworldly, all-seeing Magic Mirror and the brotherly wizards pulling the strings of the Skeleton's Hand, an elaborate, high-tech but down-home haunt in front of the Anderson house in Redwood City.
Jasper Anderson,16, Redwood City with his Halloween robotic display at his home. Eric Luse
The "man" behind the curtain is 16-year-old Woodside High sophomore Jasper Anderson, such a fan of Halloween that when he was as young as 4, he would design his costume and then go to the store with Mom (Donna Habeeb) to pick out the perfect fabrics and trims. His Harry Potter and dragon costumes won prizes in the local rec center costume contest, and, in July, an Associated Press photographer captured his getup as Lord Voldemort at a bookstore's "Harry Potter" release party.
A budding filmmaker, Jasper also loves old black-and-white horror movies and the more recent "Pirates of the Caribbean" films - skeleton Vern is named after "Pirates" director Gore Verbinski, skeleton Walter after Walt Disney, witch Maggie after Margaret Hamilton and mummy Will after William Henry Pratt, known more famously as Boris Karloff. (Jasper's got a sly sense of humor - there's also a Frankenstein in the haunt named Karl in another nod to Mr. Karloff.)
Four years ago, Jasper started getting ideas about decorating the front of the family's two-story house, but he got stuck in a Yosemite snowstorm and missed his favorite holiday altogether. That gave him a year to plan and build - and enlist the help of his brother, Ethan, and father, Chris - for what's become an annual display opening Oct. 1.
They're quite a team. Jasper comes up with ideas and sketches them, then papier-maches frightful faces for the figures. Ethan is only 12, but his is the engineering mind that deduces (with some help from his friend Andy) how to electronically animate the creatures with circuit boards in their heads. And Dad just happens to be a contractor who will happily salvage discarded wood and Styrofoam to fabricate the cockamamy creations his sons dream up.
Jasper attaching the pirate to the ship above the garage. On the roof is his younger brother Ethan helping his father Chris attach the sail. Jasper Anderson,16, Redwood City with his Halloween robotic display at his home. Eric Luse
"That's really why we're able to do this," Jasper said on a recent sunny Saturday, watching his father climb a ladder to assemble the team's newest feature, a giant pirate ship sailing out of the top of the garage that tonight will be animated with a computer-generated pirate projected onto the boat.
"He says 'we' but really it's him," Chris said.
"Jasper is the master and we all work for him," Donna chimed in.
Chris and Donna seem proud to serve, and a little awestruck by the workings of their 16-year-old's mind. "His creativity - I'm not going to stop that," Chris said. Donna said she would like to see some more cheerful scenes, "some little happy pumpkins," but she's appreciative of the restraint that Jasper exercises when it comes to not frightening the smaller kids. The Magic Mirror, for instance, is a jack-o'-lantern face that has a scarier side for older trick-or-treaters.
"He says he doesn't want to promote gore," Chris said.
"It's creepy," said Jasper, an honor student who hopes to go to film school, "but it's supposed to be fun. No blood."
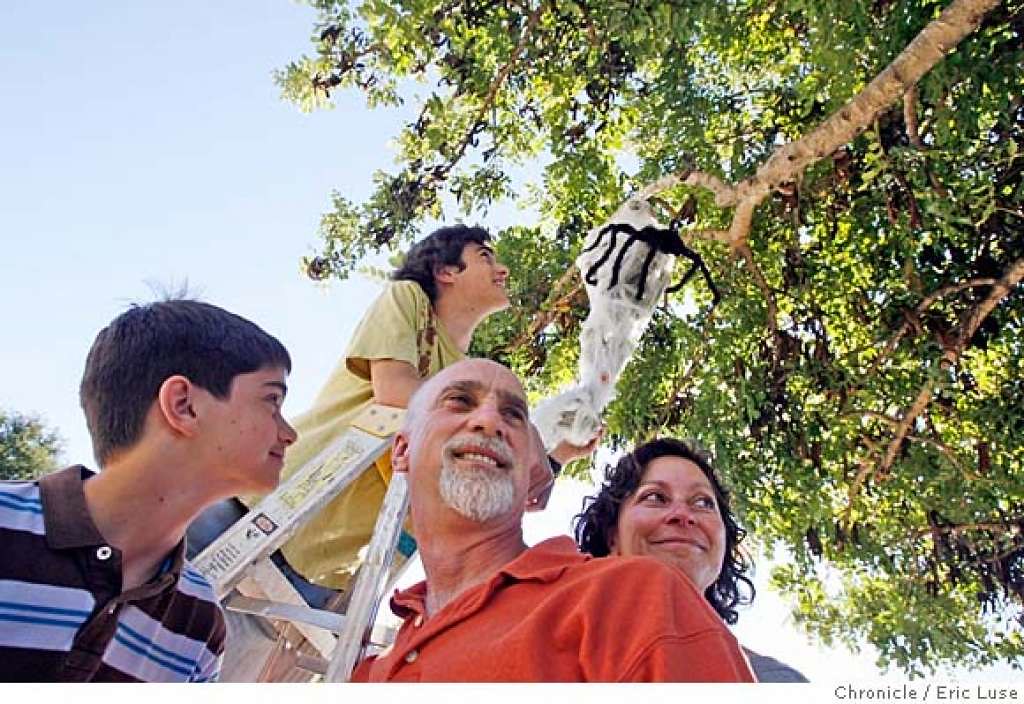
Ethan,13, Jasper,16, dad, Chris Anderson and mom Donna Habeeb with one of Japer's Halloween creatures hanging from a tree in the front yard.
The parents also appreciate the life lessons their sons are extracting from their annual exercise in creativity. Jasper and Ethan clearly enjoy it when a couple of neighborhood boys check on their progress and ask how things work, and pause to chat with seniors from the assisted-living home next door who walk by everyday to see what's new.
"I thought it would upset the neighbors, creep them out," Donna said. "But Jasper treats it like a set, changing things every day, so they actually enjoy it."
Jasper's resourcefulness includes funding. To raise money for his production, he mows lawns, handles sound and lighting at an area theater, and even created a sister to Maggie the witch for a neighbor. He can make an entire skeleton from 50 sheets of newspaper and sometimes finds defective medical teaching skeletons at half price. Fingernails come from plastic water bottles, heads from wig forms covered in Crayola Model Magic clay. A thrift-store sheet wraps a mummy, tombstones are sheets of Styrofoam lettered with the tip of an empty, hot glue gun. One of his gags is just a simple piece of paper rendered into a Lost Monster posting that can go up on a neighborhood tree for amusing double takes.
"Of course, the time to shop is after Halloween," he noted.
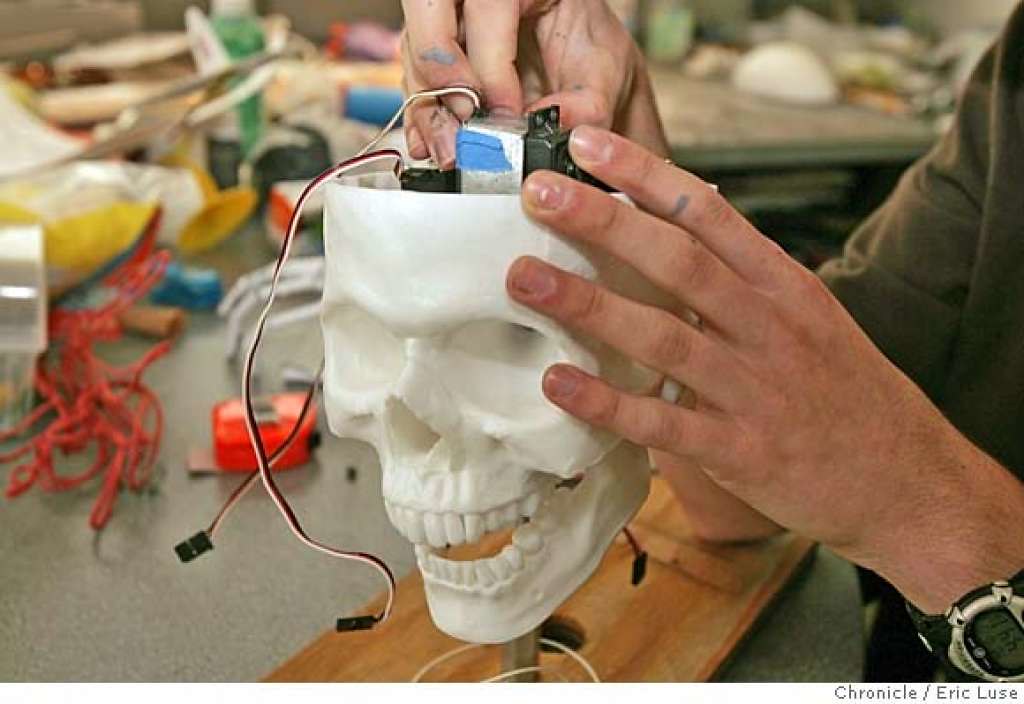
In his workroom Jasper works on the servo robotic skull that goes in the pirate ship above the garage. His brother will be the distorted voice for the skull.
More elaborate are the animatronics skulls controlled with an airplane remote. The brothers use Adobe After Effects for animation, as well as Final Cut Pro and the free Audacity sound program. Jasper found the pirate jokes on a Web site and recorded them with Audacity, using his own voice, at quiet moments in the house.
Theirs is one of the bigger houses on their block of ranch-style homes, and that's because Chris built an addition a few years ago that includes an upstairs laundry/project room where creativity blossoms year-round. The desks are covered with paint, glue, art materials and electronica. Donna has her own projects - she makes jewelry when she's not managing Chris' business.
If there's a "make things" gene, it's surely in the family, and the Andersons will put it on full display this evening. Last year, more than 150 trick-or-treaters stepped up to the Magic Mirror, which had the face of a gargoyle and spewed vapors when it distributed treats.
First, though, it wanted a song or a dance. Jasper couldn't believe how many trick-or-treaters complied. Visitors this year might be asked for a cartwheel or a headstand - Jasper's not saying what the Magic Mirror's got in mind. He is, however, already thinking about next Halloween.
"Next year, I think all the skeletons will be a singing group in the garage," Jasper said.
Team Anderson awaits its instructions. Even Donna.
"Although my mom originally wanted to get more cheerful features in the haunt," Jasper said, "she is now shopping in the spooky aisles with me."
I'm sorry if you're seeing a bunch of error messages from Photobucket as you're reading my blog now. They recently issued a surprise change to their terms of service, and now won't allow you to see pictures that I've hosted there unless I pay $400 per year.
I'll be slowly migrating all ten years of photos (776 images) to another host so this blog can live on.
I know I have dozens of projects on HauntForum, HalloweenForum, and the RPF that are also affected, and I'll do my best to save those soon, too. But it will take a while.
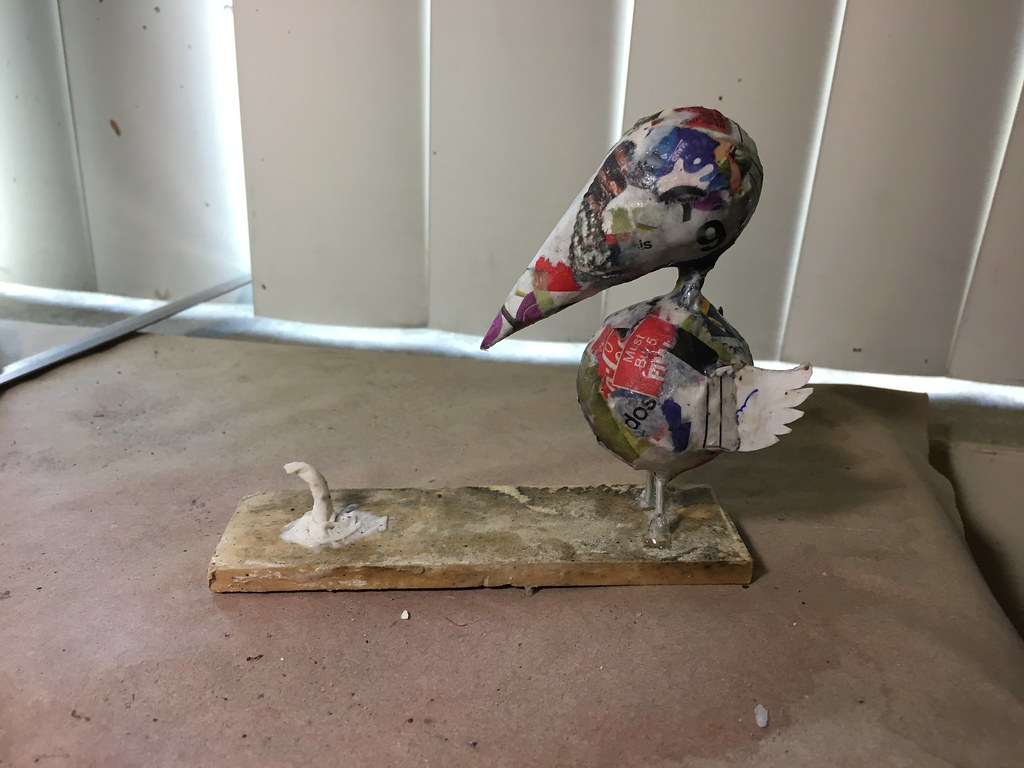
Before buckling down to Midsummer Scream prep, I spent a Sunday afternoon doing a little loosey goosey craft day.
I sketched out a little scene that popped into my head the night before. It felt like a good candidate for paper mache.
I used some assorted spheres I had collected for the body shapes, a bit of aluminum wire for the neck and legs, old business cards for the nose and feathers, and a well used paint stick for the base.
It's been years since I did any actual paper mache (see Appendix B: "Chicken Mache"). I used to do water and flour, but I never liked that much. I had some off brand white glue that I mixed with water and flour (for a little texture maybe?), and dipped my newspapers in that. I used paper towel for the worm and dirt because it's a little softer.
I stuck that in front of a fan for a few minutes and it was ready to paint.
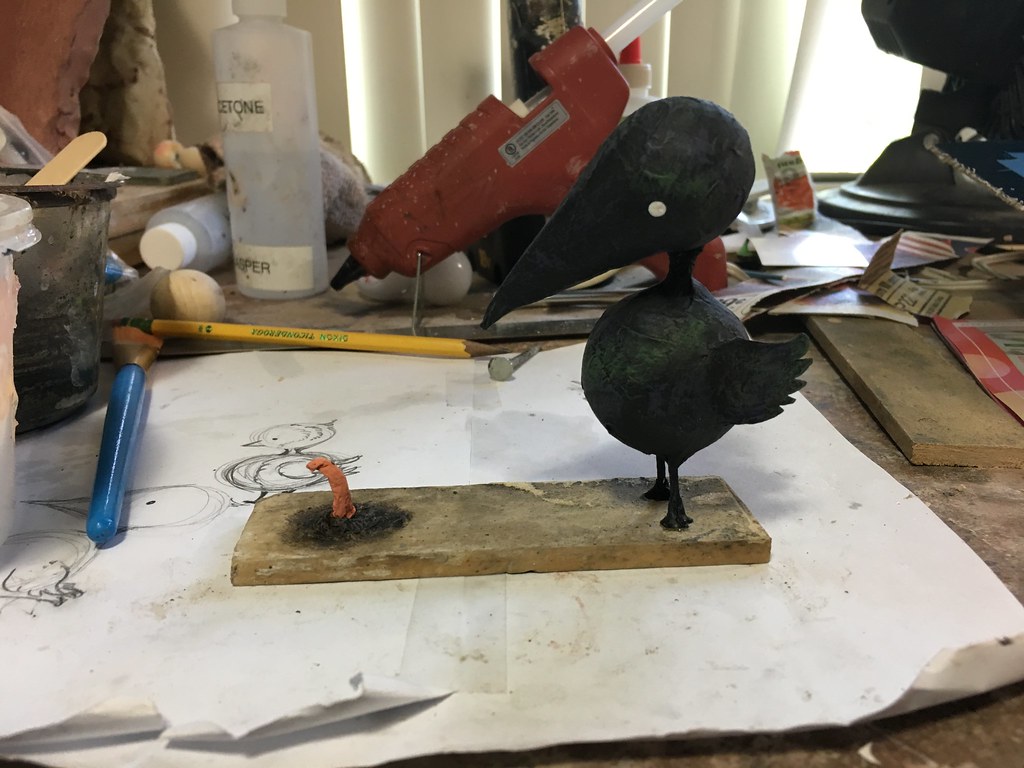
I tried to get a sort of iridescent quality to the bird by selectively drybrushing some green and purple. Even if it doesn't read quite like that, I just didn't want it jet black. You'll see it's all a little dark here, but the clear coat on top (polycrylic-- I've been nursing a gallon of that for several years now) makes all the colors pop.