You know what you need? Some Haunted Tombstone projection effects. Perfect last minute props, big bang for your buck. Yep. Oh, and they're on sale!
This month only (Oct. 2014), the entire Haunted Tombstone Collection (the original tombstone, the second taller tombstone, and the two together in one video frame) are available as a single download for only $50! That's like 60% off! Holy spooks!
Even if you have one or two already, this is waay cheaper than getting the rest individually. Get 'em while the gettin's good.
Check out the How To below if you haven't, and head over to ChickenProps.com to see more and get yours.
PLUS: did you know I have another effect out this year (besides Sybil the Clairvoyant, our resident disembodied medium, of course)? "Spooks!" is now available. A $25 loop of swirling green ghosts. See them in the background of the Sybil video:
Tuesday, September 30, 2014
Nervous ToT Zombie: Part 2, Drybrushing and Eyeballs
Updates!
Moving quickly on this guy to have him done before the weekend.
Once the mache (which DevilsChariot has been calling "Chicken Mache" haha) was dry enough, I started dry brushing. Drybrushing, washes, and rubouts are awesome for getting "free detail" in your paint jobs. I took a little of the base color, and mixed it with white and yellow to get the drybrush color. Actually, I did about three or four variants on that color to keep things from getting too much the same all over.


Now I'm going to turn you onto another cool trick. You can get this stuff called Polycrylic at Home Depot. I think it's for sealing wood, but it gives a nice clear satin finish to just about anything. Just makes things pop a little better than if they were matte. It's pricey at about $50/gal, but you hardly use any. If you don't stir it, it comes out glossy, which is kinda neat, too.
Someone asked about the eyes. I think it's a trick I got from Born2Haunt: http://www.born2haunt.com/Ledeyes01.html
I believe these ones were a little plaster mold I made of a half ball of clay. Shoot in some hot glue (no need to fill it, just skin the surface. Bam. Eyeballs. I run the thing under cold water to speed up the glue cooling down.

I decided to paint the eyes. I had left them glue colored before because they have LEDs behind them, but they look kinda lame in the daylight like that. Turns out the light will still shine through a thin few layers of acrylic.

Then I glossed them. I did the teeth with an acrylic gloss, and it looked fine, but I really want the eyes to pop, so I used a couple coats of 5 minute epoxy. It doesn't show up so great in this picture, but I'll do a proper photoshoot later in the week.

So now we're at like 95% complete. I'm toying with the idea of giving him a little bit of costuming to go with the ToT bucket. We'll see...


Moving quickly on this guy to have him done before the weekend.
Once the mache (which DevilsChariot has been calling "Chicken Mache" haha) was dry enough, I started dry brushing. Drybrushing, washes, and rubouts are awesome for getting "free detail" in your paint jobs. I took a little of the base color, and mixed it with white and yellow to get the drybrush color. Actually, I did about three or four variants on that color to keep things from getting too much the same all over.
Now I'm going to turn you onto another cool trick. You can get this stuff called Polycrylic at Home Depot. I think it's for sealing wood, but it gives a nice clear satin finish to just about anything. Just makes things pop a little better than if they were matte. It's pricey at about $50/gal, but you hardly use any. If you don't stir it, it comes out glossy, which is kinda neat, too.
Someone asked about the eyes. I think it's a trick I got from Born2Haunt: http://www.born2haunt.com/Ledeyes01.html
I believe these ones were a little plaster mold I made of a half ball of clay. Shoot in some hot glue (no need to fill it, just skin the surface. Bam. Eyeballs. I run the thing under cold water to speed up the glue cooling down.
I decided to paint the eyes. I had left them glue colored before because they have LEDs behind them, but they look kinda lame in the daylight like that. Turns out the light will still shine through a thin few layers of acrylic.
Then I glossed them. I did the teeth with an acrylic gloss, and it looked fine, but I really want the eyes to pop, so I used a couple coats of 5 minute epoxy. It doesn't show up so great in this picture, but I'll do a proper photoshoot later in the week.
So now we're at like 95% complete. I'm toying with the idea of giving him a little bit of costuming to go with the ToT bucket. We'll see...
Monday, September 29, 2014
Nervous ToT Zombie: Part 1, Armatures and Corpsing
It's been a while since I made a regular Halloween prop, since I haven't had a haunt of my own for a few years. I recently got an opportunity to make something, so I decided to go back to my roots with a goofy zombie. I used to do plenty of groundbreakers, but I never got to do a full figure zombie in my style, so that's this week's project.
I like to start with a sketch. I don't draw, but I can doodle!

The armature is in my traditional style-- 3/4" PVC, X coupler at the shoulders, T at the pelvis. All the other joints are posed simply with a heat gun. It makes for a cheaper structure that has fewer weak points. Perhaps most importantly, it allows for infinite flexibility in the pose, which I think is the most important part of a static character. This post by Pumpkinrot really sums it up for me.

I do the ribs, bone knobbly bits, and such with rolled or crumpled newspaper, as in my skeleton tutorial:http://www.instructables.com/id/Paper_Mache_Skeletons/
Cardboard sternum, pelvis, palms of the hands. Wire fingers.
And then I go for the skin. A few folks know how I do mummified corpse skin, but I don't think I've explained it publicly yet. It's basically just paper towels soaked in latex house paint. Lay it on, wrinkle it up. It dries super hard, depending on how much paint is on the towel, is basically waterproof, and gives you your base color
I do the majority while he's upright, so I can get all around

You'll notice the hands aren't attached when I begin corpsing. I find it's easier to do them when you can get all around, and since they're going to be all tangled up together, keeping them separate seemed the way to go.

Then I lay him on his back to do the stomach and neck. If I did these standing up, the paper towels wouldn't drape as nicely.

By the way, you probably noticed the head is already done. That was a little guy who peeped around the corner last year. I figured his expression was close enough that I could repurpose him to save some time. I actually rather liked doing it this way, though.
More to come...
I like to start with a sketch. I don't draw, but I can doodle!
The armature is in my traditional style-- 3/4" PVC, X coupler at the shoulders, T at the pelvis. All the other joints are posed simply with a heat gun. It makes for a cheaper structure that has fewer weak points. Perhaps most importantly, it allows for infinite flexibility in the pose, which I think is the most important part of a static character. This post by Pumpkinrot really sums it up for me.
I do the ribs, bone knobbly bits, and such with rolled or crumpled newspaper, as in my skeleton tutorial:http://www.instructables.com/id/Paper_Mache_Skeletons/
Cardboard sternum, pelvis, palms of the hands. Wire fingers.
And then I go for the skin. A few folks know how I do mummified corpse skin, but I don't think I've explained it publicly yet. It's basically just paper towels soaked in latex house paint. Lay it on, wrinkle it up. It dries super hard, depending on how much paint is on the towel, is basically waterproof, and gives you your base color
I do the majority while he's upright, so I can get all around
You'll notice the hands aren't attached when I begin corpsing. I find it's easier to do them when you can get all around, and since they're going to be all tangled up together, keeping them separate seemed the way to go.
Then I lay him on his back to do the stomach and neck. If I did these standing up, the paper towels wouldn't drape as nicely.
By the way, you probably noticed the head is already done. That was a little guy who peeped around the corner last year. I figured his expression was close enough that I could repurpose him to save some time. I actually rather liked doing it this way, though.
More to come...
Sunday, September 21, 2014
Still Shipping!
Sybil the Clairvoyant kits are still shipping! Order yours now from my new Mr. Chicken's Prop Shop: ChickenProps.com site to have Sybil conjuring spirits in your haunt for Halloween 2014.
Here's how easy it is to set her up:
Don't forget she now has an optional crystal ball (pictured below)

Or you can get her in the latest-and-greatest PRO version, with internal projection and a moving head!
Click here to find out more!
Here's how easy it is to set her up:
Don't forget she now has an optional crystal ball (pictured below)

Click here to find out more!
Friday, September 5, 2014
Museum of the Weird

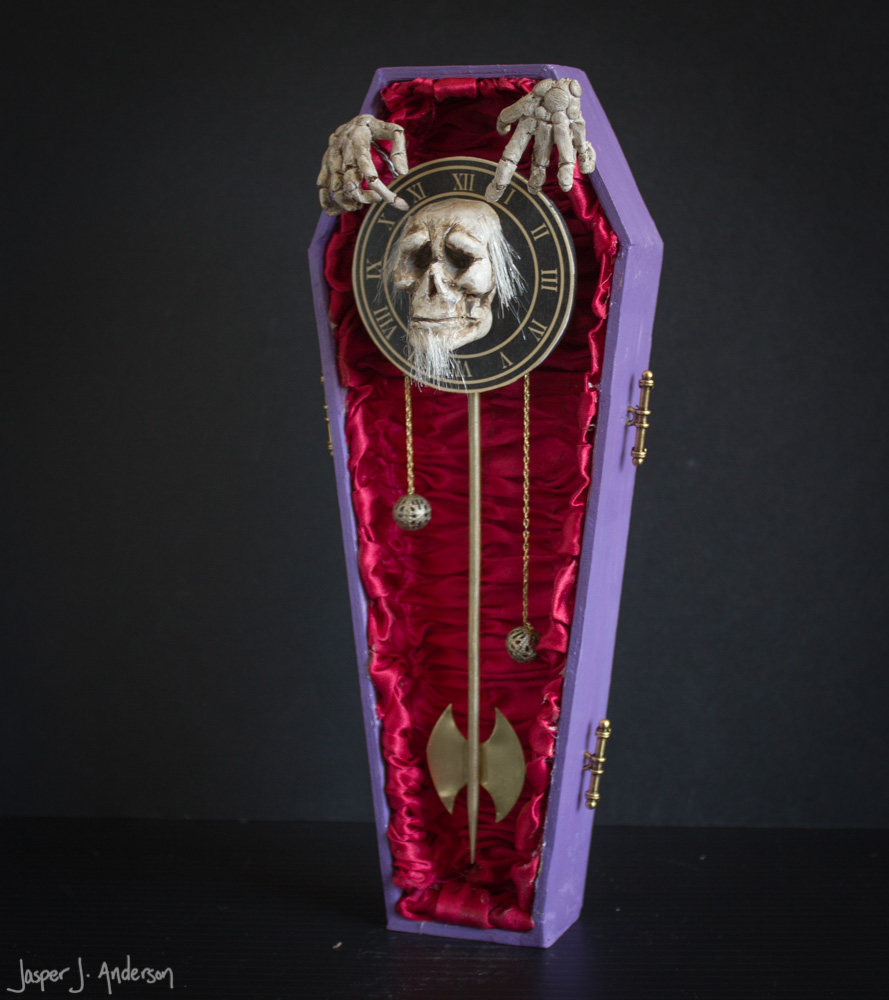
Before the Haunted Mansion as we know it, Imagineer Rolly Crump designed a "Museum of the Weird." Next Saturday, Sept. 13, Creature Features in Burbank is hosting the opening of their "Museum of the Weird" gallery show, with Rolly himself in attendence!
Stop by to see my Sybil the Clairvoyant conducting a seance, as well as my new recreation of Rolly's Coffin Clock maquette (seen in the foreground in the image at the top of the post). Pictures of mine are later in this post.
Details on the event here:https://www.facebook.com/events/668040166608199/
Details on the event here:https://www.facebook.com/events/668040166608199/
Here's a little background on the Museum from the Disneyland 10th Anniversary Special (starts at 1:37, but watch from the beginning to see Marc Davis talking about the Haunted Mansion, too!):
***
Now, here's my Coffin Clock, with Rolly's original below:
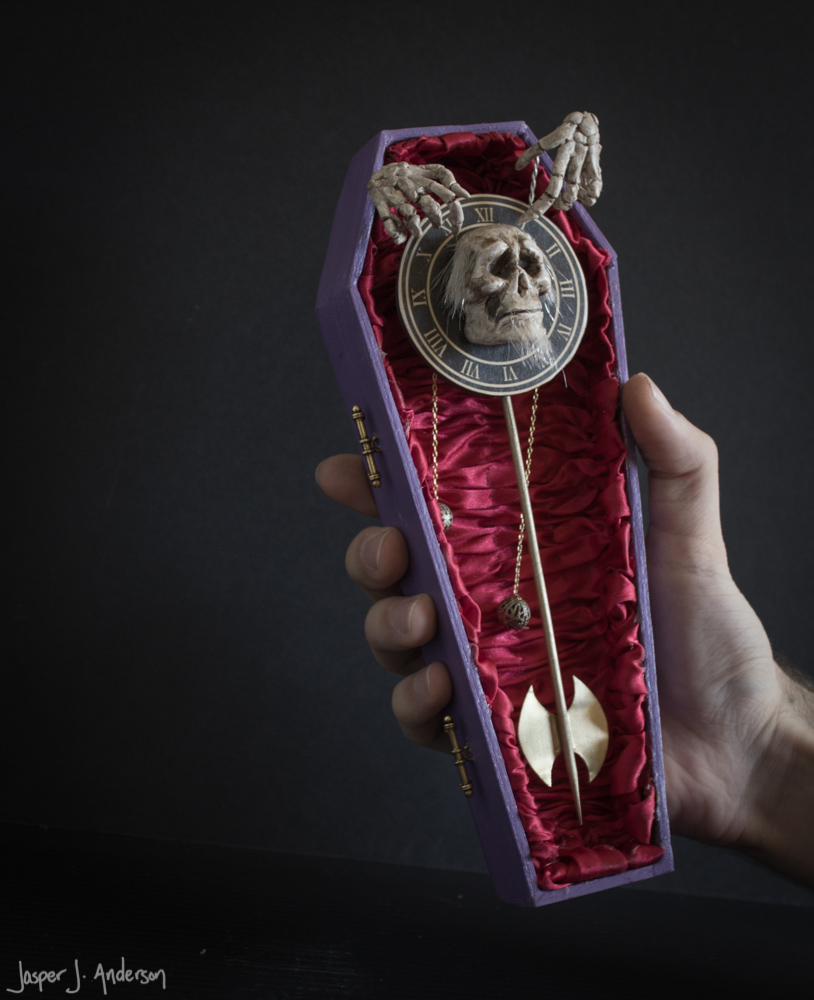

Not exact, perhaps, but not too far off, either!
While not a full how-to, here are some making of photos to give an idea of how it came together.
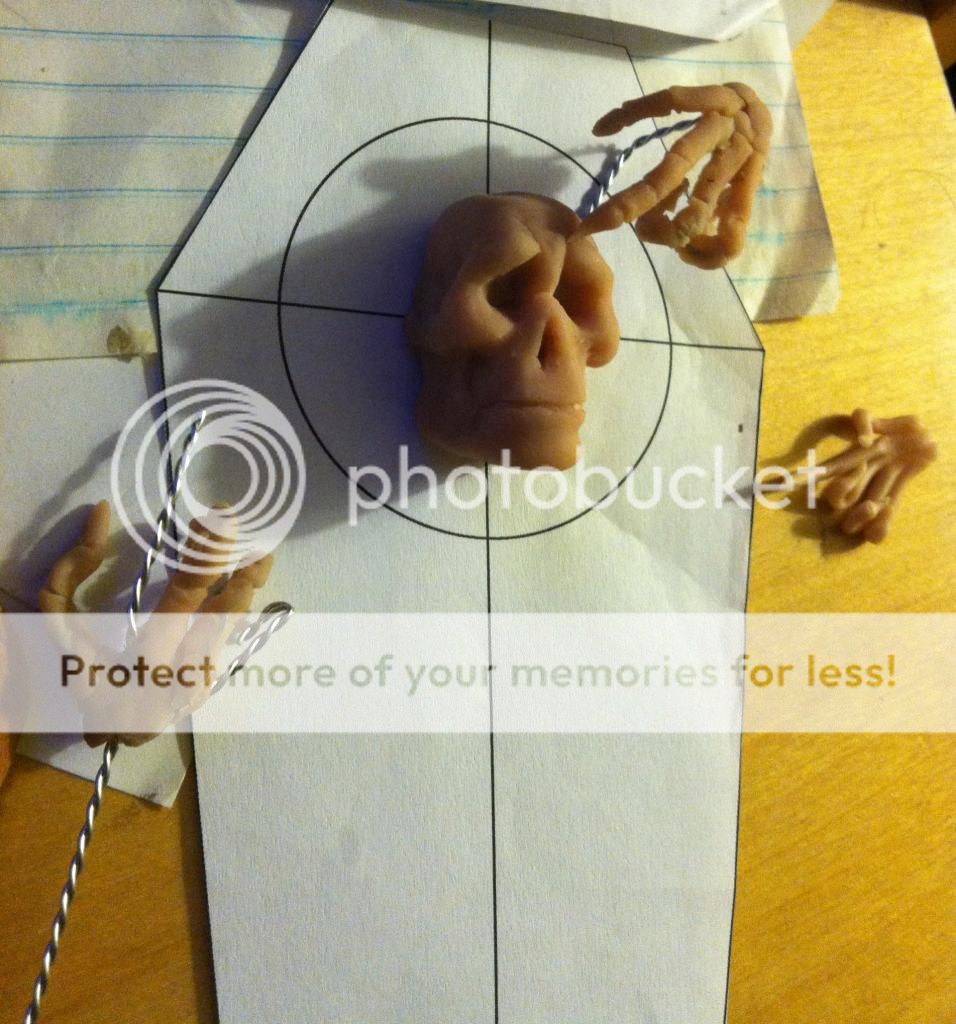
The dimensions of the coffin were designed in Illustrator and printed for reference. The skull and hands are being sculpted with Super Sculpey here.
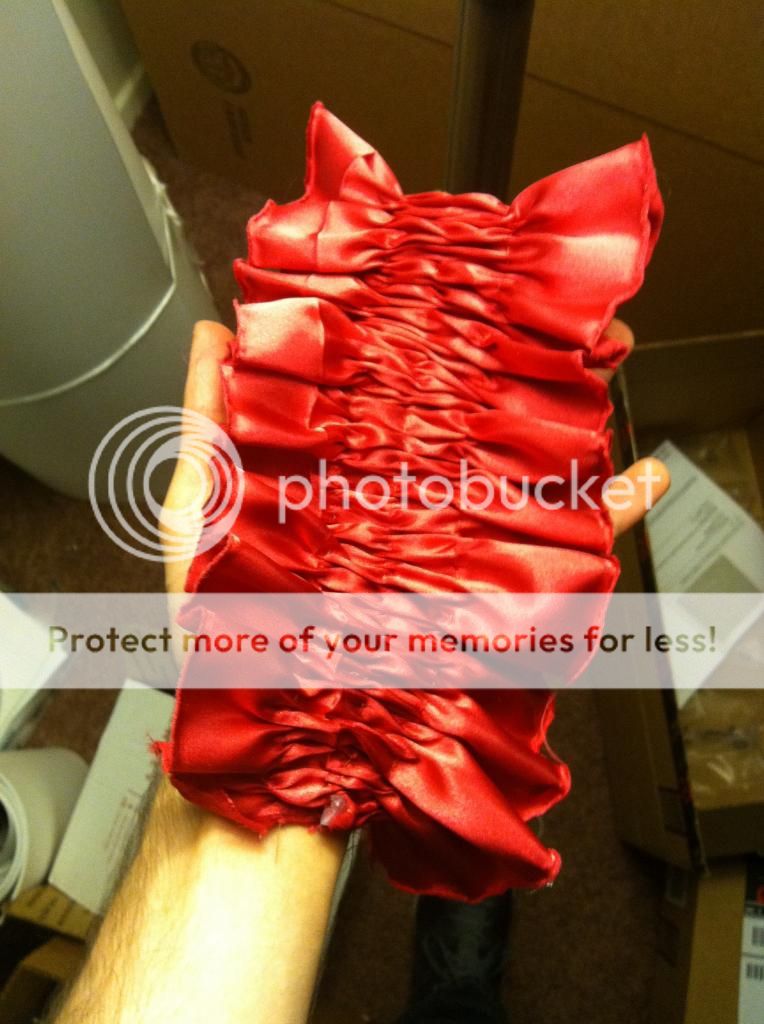
To make the fabric, I penciled lines on the backside, then stitched up and crumpled it down.

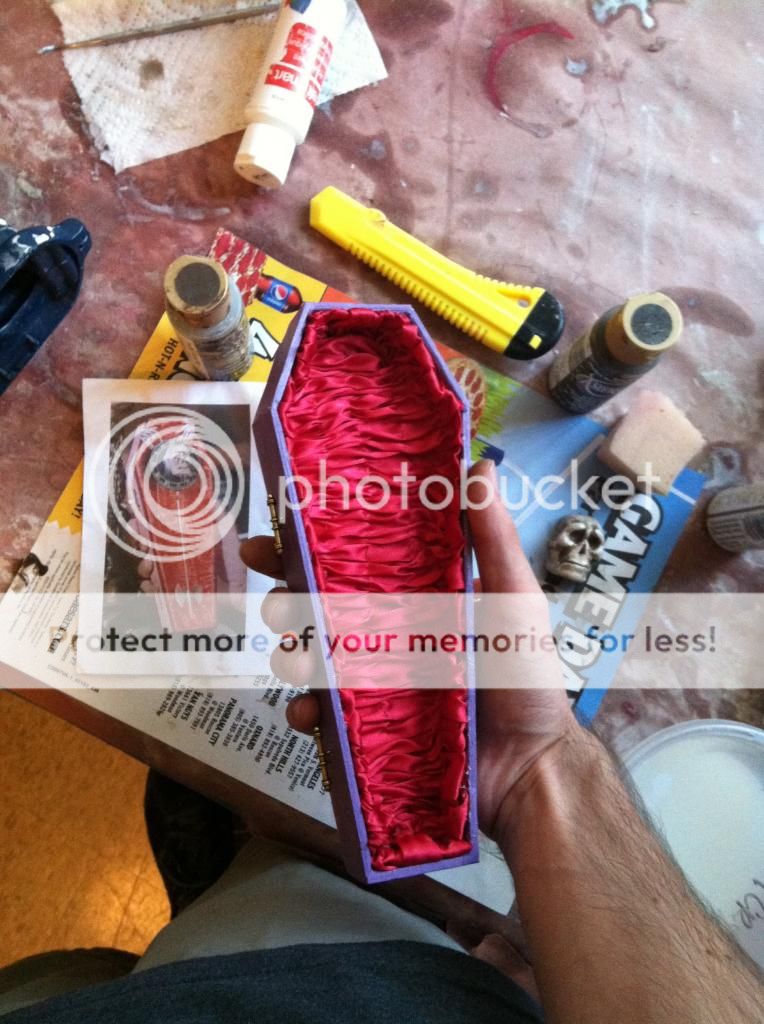
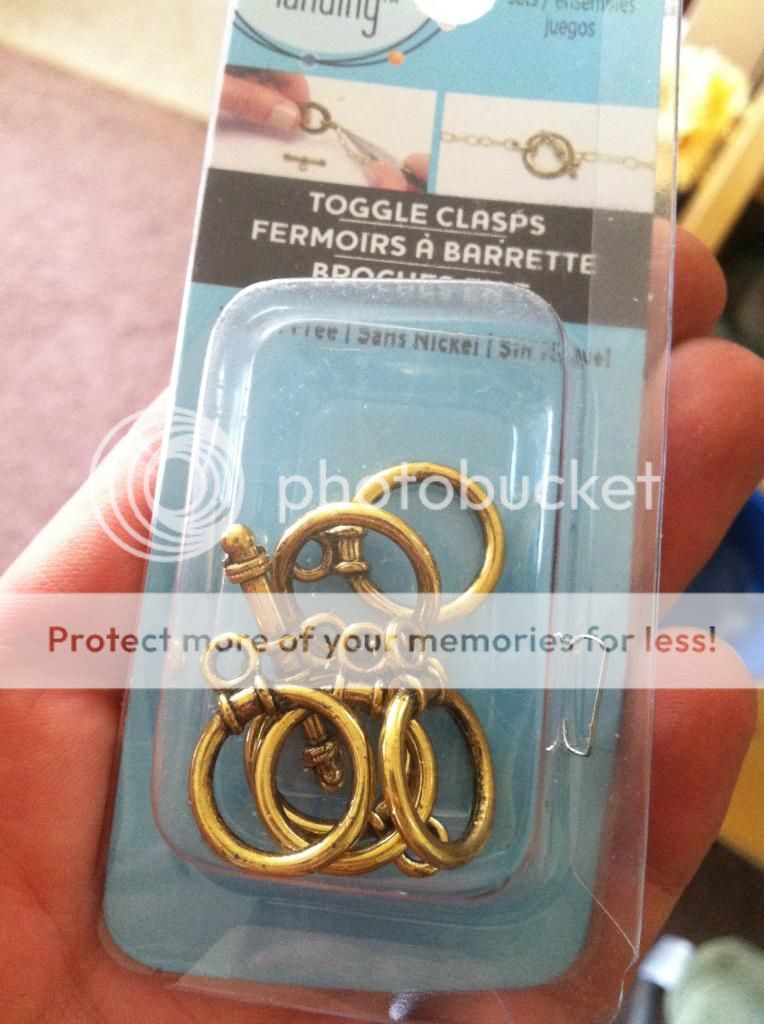
Much of the coffin hardware is from the jewelry section of the craft store
The clock face was made in Photoshop, printed, mounted, and laminated

All the doodads were first attached to the clock face, and that whole assembly mounted in the coffin as one piece.
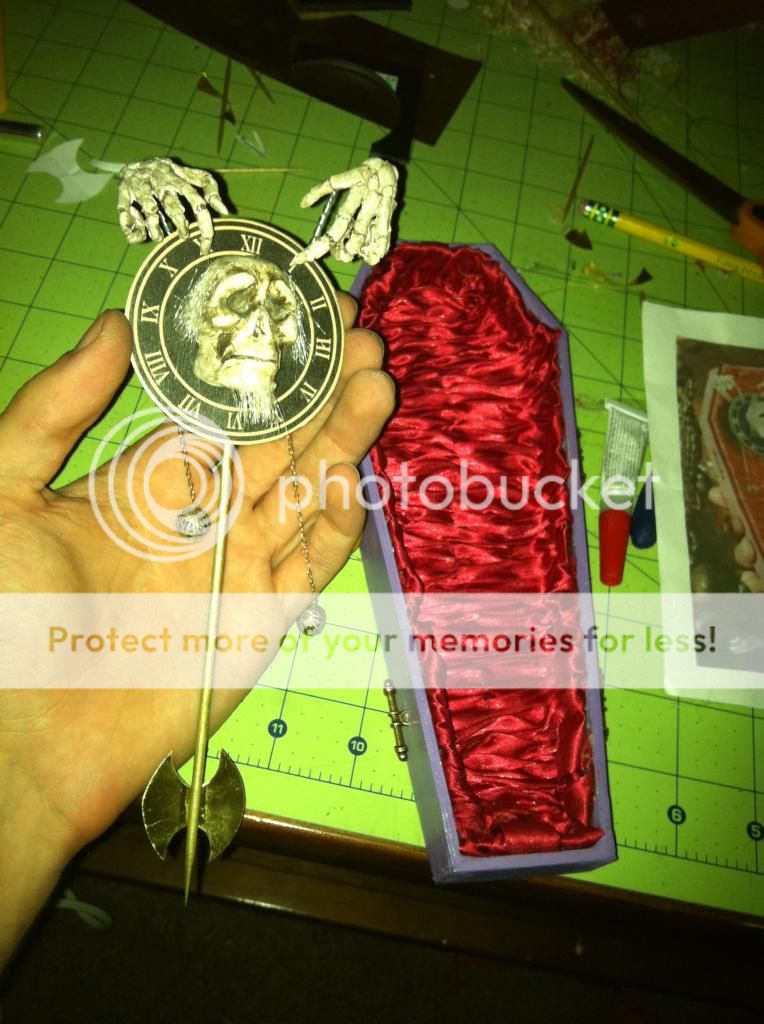
You can tell by the lighting above that I just finished this up late last night! I was able to snap some nicer pictures before delivering it to the gallery today.
Subscribe to:
Posts (Atom)