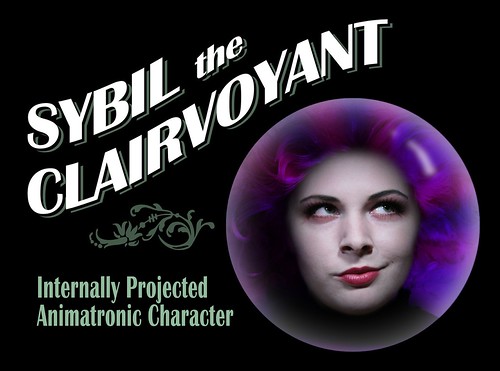
A lot of pictures on this site were hosted on Photobucket before they disabled photo embedding. If you'd like to see pictures for a particular post, please let me know, and I'll prioritize getting those images fixed next!

Monday, July 28, 2014

Sybil 2.0

So, wondering what's going on with this year's products?  The time has come.

Sybil Ad for video

Sybil the Clairvoyant is now available as a professional, already assembled effect.
But now she's completely self-contained.  No projector to hide.
And her whole head moves.

This is pretty darn cool, if I do say so myself.


Available now at ChickenProps.com


Sunday, July 27, 2014

Spooks! Projection Effect

The big news is still on the way, but in the meantime, you can now invite some of my favorite ghosts over to play with Spooks! A new projection effect offering.


I've had a few requests for a video featuring just the ghosts from the Sybil the Clairvoyant effect, either to populate the rest of the room, or to add a bit of ambiance to a graveyard scene.  Here it is!

Stop by my booth at ScareLA to see it in action, or, for the impatient, download it right now for $25!
You can see them floating around in the Sybil video:

Tuesday, July 15, 2014

Freak Show

Did you catch the new teaser for American Horror Story: Freakshow?


What? You heard it's not official?  But Hollywood Reporter, EW, E!, Vanity Fair, ComingSoon.net, io9, Cosmopolitan, MTV, Perez Hilton, Shock Til You Drop, Bloody Disgusting, IGN, and just about everybody else on the internet said it was!

Yes, the secret's out.  I was the makeup effects artist on this phoney teaser.
You can read about it in this interview with the director, my friend Kellen Moore, on IndieWire:

http://www.indiewire.com/article/heres-how-to-make-a-viral-video-american-horror-story-teaser-creator-tells-all-20140715

1000px-8259

1000px-8249

I also designed the mechanics for the wings, but because of the time crunch and limited budget, they were done in the computer.

Friday, July 11, 2014

Making A Crystal Ball for Sybil, part 2

On to Phase 2: Molding and Casting!


So, I glued the sculpture to an 18" tile to prepare for molding (typically people use melamine board, but I couldn't find any a reasonable size, and this was only a couple bucks). A gave it three coats of clear spray paint, and one pass of Ultra 4 Epoxy Parfilm, a release agent that is paintable, meaning it won't leave residue on the mold (and later, when I use it in the mold to release the castings, it won't leave residue on the castings, so I can paint on them without having to clean off an oily release).


Then I went in with silicone. The plan is to do enough silicone to cover the piece and fill in undercuts, then back that up with a rigid shell to hold its shape. This silicone is Mold Max 30 from Smooth On. It seems to be working pretty well, and it's a bit cheaper than the stuff that I usually use. Plus it's so pink and pretty! :P


That was the first layer, brushed on thin to get the surface details.

I went in with several more layers until all the undercuts of the sculpture were filled in. These layers I added a thixotropic agent to (Thi-vex, from Smooth On). This makes it more paste-like, so I can put on a thicker layer without it dripping so much. There are brushable silicones you can buy, but adding the "thixo" means I only have to buy one kind of silicone, and I can modify it to do different things. In total there are about 1.5 quarts of silicone on this.


You'll also notice some rectangles on there. I made those ahead of time and stuck them on to act as keys, so the silicone would register in the right spot in the hard shell later.


The shell is just two layers of burlap dipped in ultracal:


And when everything was set and cured, I demolded!


Into the mold, after a few passes of parfilm, I brushed a 2-part expanding rigid polyfoam. I only need enough to make the thing hold its shape, and the weight of the globe.


Once THAT set, I demolded to find a pretty darn good first casting.


A bit of gold, a bit of black, and a nice big acrylic globe on top, and there we go! Here's Sybil's new crystal ball home.


I might still give it a gloss coat...we'll see.


Now, you might be wondering why there's a big ugly hole in the middle of the base, when her head would fit perfectly right on the flat surface that I sculpted. I'm not telling. Not yet. But the reason is really cool, if I do say so myself. ;)

Monday, July 7, 2014

Making A Crystal Ball for Sybil, part 1

You may remember my Sybil the Clairvoyant effect from last year...

At the time, I displayed her in a gutted Gemmy Spirit Ball (if you want to see a young Mr. Chicken disassembling it, check out this:http://www.freewebs.com/skeletonhand...spiritball.htm)

I figured it's time to personalize it. The plan is to fabricate, mold, and cast a custom base for a larger 16" globe. Here we go!

I did some research into antique hardware for some ideas, and was really attracted to this winged lion motif I found. I sketched out a bunch of designs one day, and settled on this:


And then it was a matter of sketching out the deigns full size.


This guy will replace the flowery design in the sketch


See, I only want to sculpt each of the little critters once, so I'll be molding and casting duplicates to stick around the base.

I laid warm clay over the outlines, and carved it into shape as it cooled


Quick and dirty molds were made in LifeForm silicone (because it is platinum based and therefore will not interfere with the later platinum silicone, and also because it is very quick setting, but mainly because I had it handy)


Now I could spread melted clay into those molds to make duplicates, and stick them onto the base, which I'm forming out of foam core


Those little beads are from the scrapbooking section of the craft store. THey come on a sheet of sticker paper. Super nifty.

Once I put it all together, though, I realized it was going to be much too tall like this.


So now I'm reworking it to be more like this


Next up is finishing off the sculpture and molding it. More to come!